diy pasta wine stoppers
a playful polymer clay craft for wine lovers, pasta lovers, and anyone who likes a handmade gift sure to make a friend smile
- 🍝 playful but still actually useful — every wine drinker needs a stopper, and this is a much nicer one than a plain cork
- 🎨 easy to personalise with colour and pasta shapes — match your friends kitchen, or pick their favourite pasta
- 👯 perfect for a craft night with the gals (and a bottle of wine, obviously)
- 🎁 makes a properly fun handmade gift that beats another candle
- 🍷 ideal as a dinner party favour, hostess gift or italian-night bundle
- 🇮🇹 doubles as a tiny italy-themed kitchen accessory the whole year round
learn how to make diy pasta wine stoppers using polymer clay, acrylic paint and gloss varnish — with the four pasta shapes broken down individually, the cork-fit lesson I learned the hard way, plus variations for other foodie themes (olive oil bottles, prosecco, pizza night) and an italian dinner party gifting bundle that bumps these from craft project to cute hostess gift.
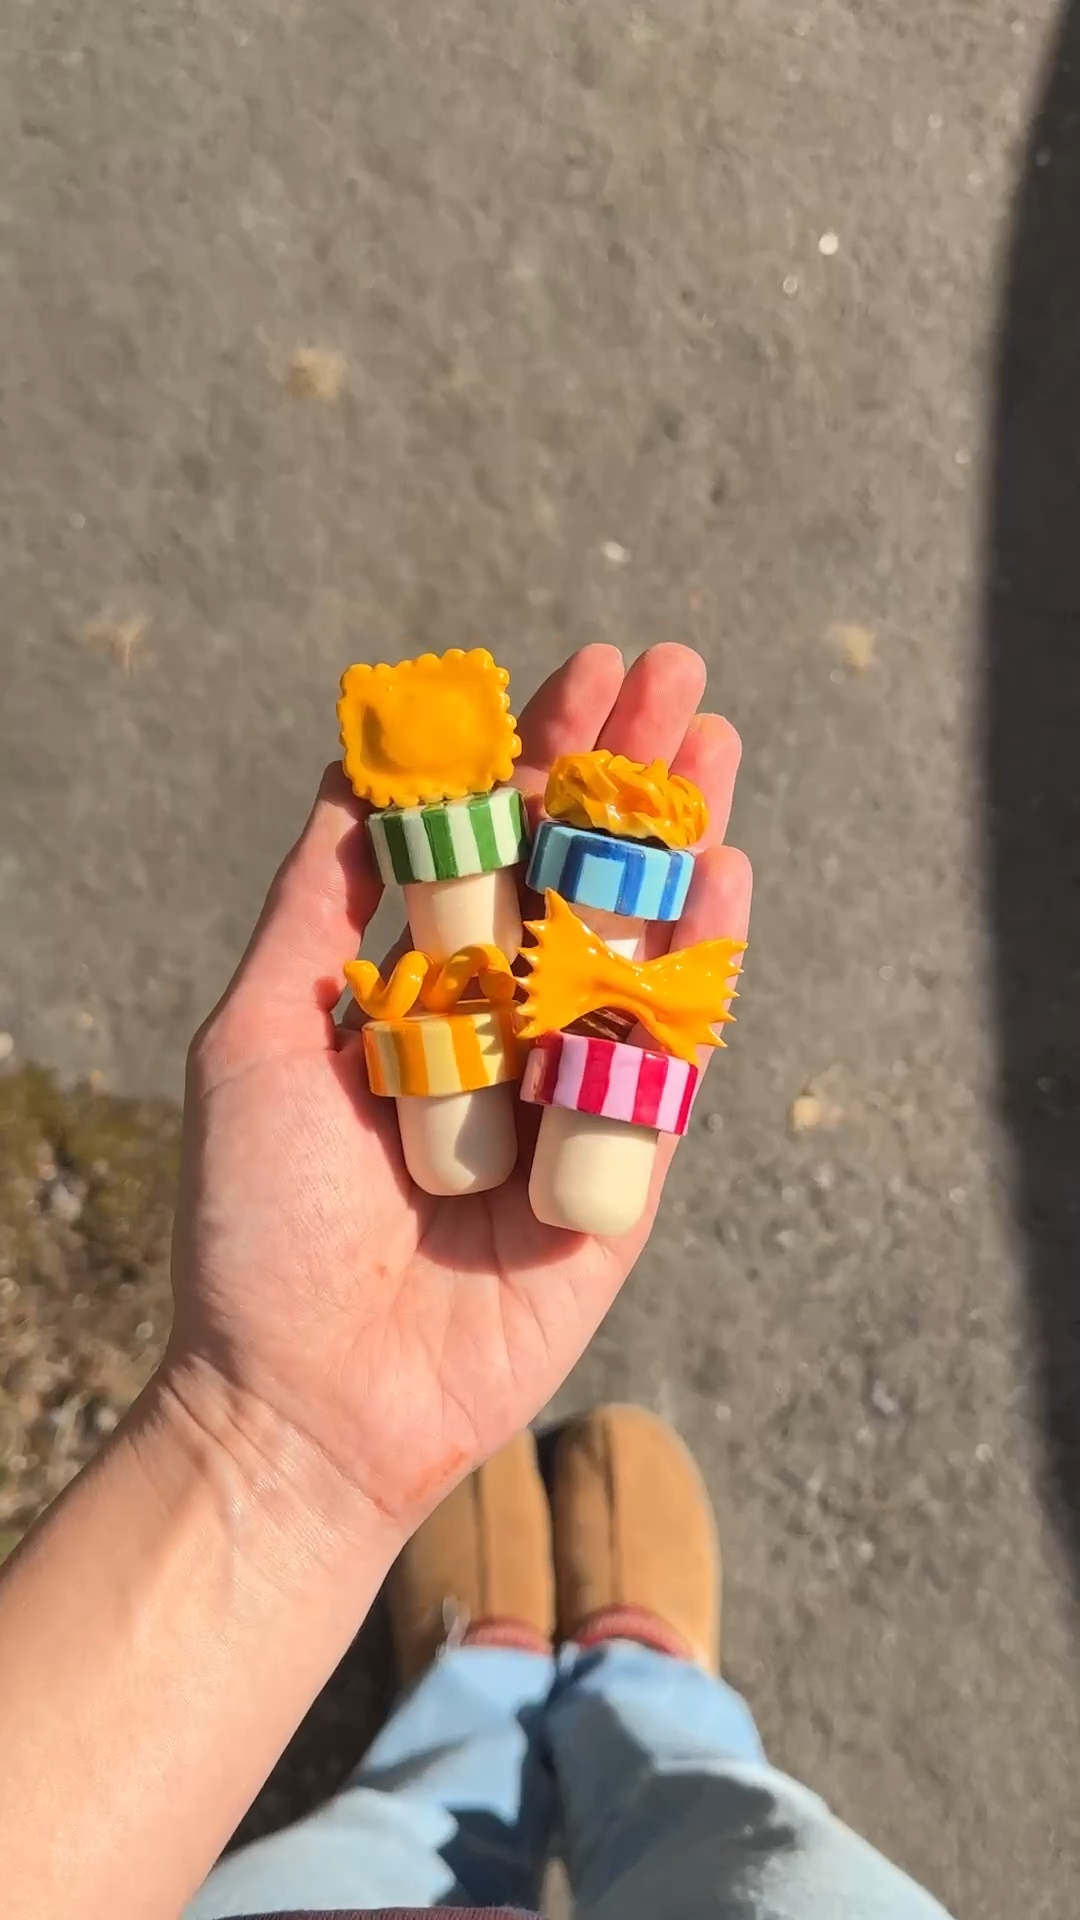
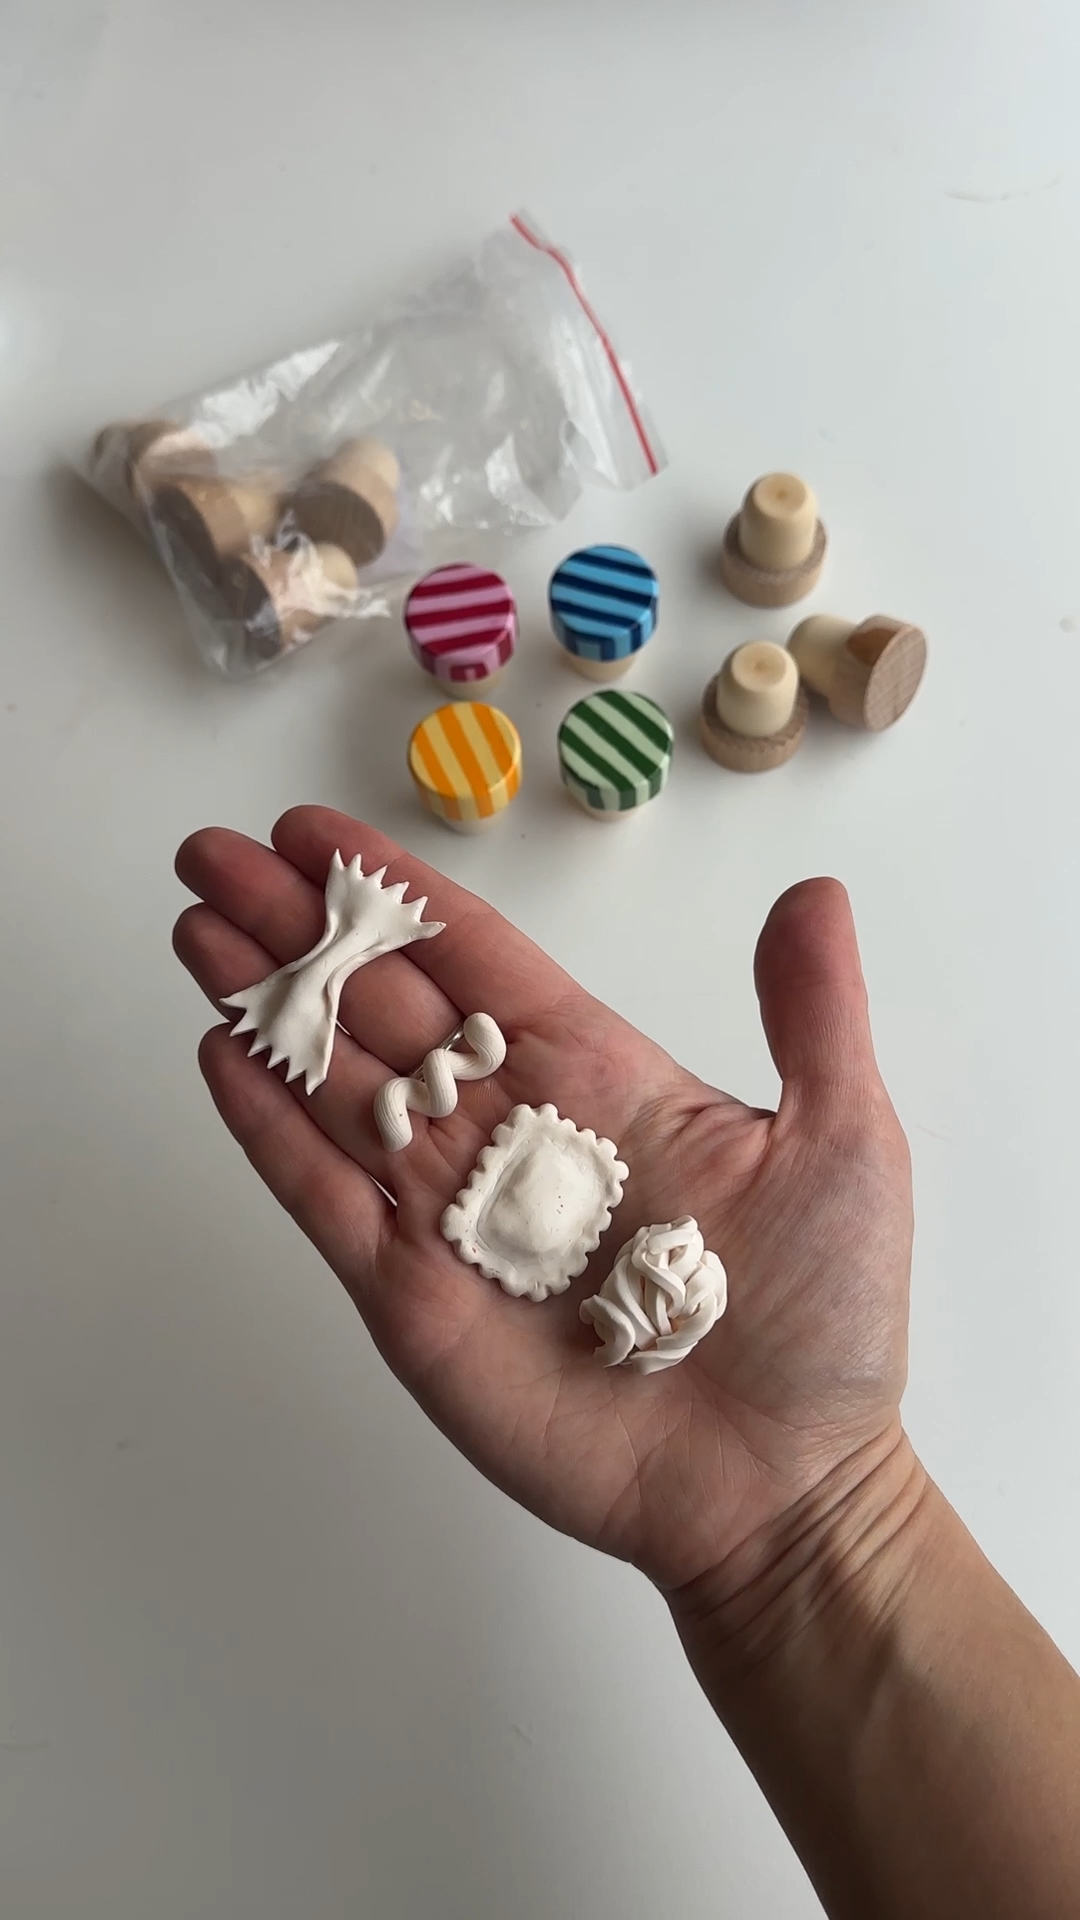
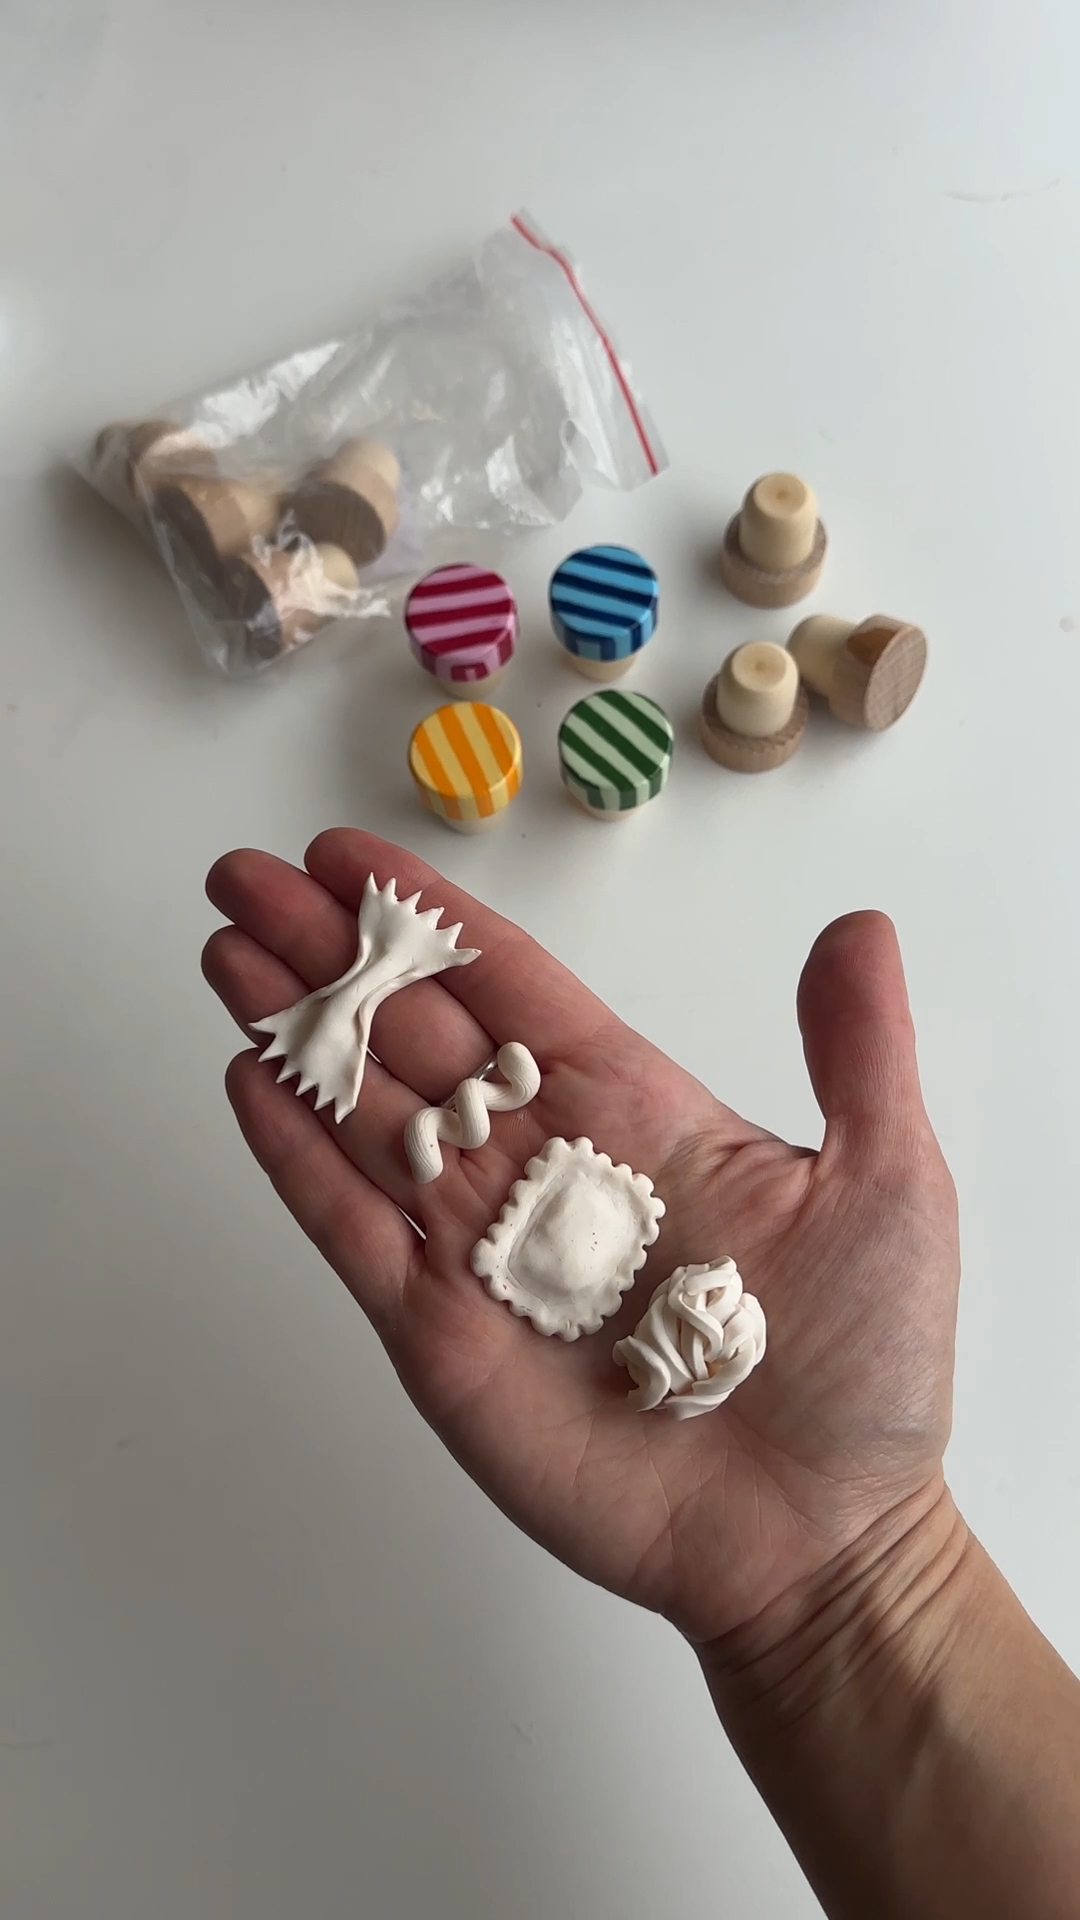
four tiny polymer clay pasta shapes — a little ravioli, a tagliatelle nest, a fusilli twist and a farfalle bow-tie — sat on top of striped wooden cork wine stoppers. that's the whole project. and somehow it still ends up looking like the most considered little thing on a dinner party table.
if you have a friend who is properly obsessed with pasta night — or you just want a light hearted craft night project — this is the one. it's beginner-friendly, finishes in one evening, and turns a plain bottle stopper into a colourful pasta-themed bottle top that feels like a tiny pasta night accessory.
materials
- wooden cork wine stoppers — narrower-fit style, food safe and intended for bottle use (test in an empty bottle before you start, see tip below). 2–4 stoppers for a small gift set.
- hobbycraft polymer clay — around half a block in total for four pasta shapes, plus a little extra for off-cuts. any oven-bake polymer clay works.
- acrylic paint for the stopper stripes — small pots of pink, green, yellow and blue, plus a lighter base colour like cream or off-white if you want the stripes to pop.
- acrylic paint for the pasta shapes — a small pot of warm pasta yellow, plus tiny amounts of white, red and brown for any detailing (the ravioli edge, the tagliatelle nest threads, a hint of sauce).
- hobbycraft gloss varnish — clear, water-based works fine. you'll use it on both the stripes and the pasta shapes.
- super glue — clear, gel formula is best because it doesn't run.
tools
- small paintbrushes — a couple of sizes (fine for stripes and detail, slightly thicker for varnish)
- oven for baking polymer clay — your normal kitchen oven is fine, just follow the temperature on the clay packet
- a small bowl of water and paper towel for shaping and cleaning
- a craft mat or sheet of baking paper to work on
- cocktail sticks — really useful for the fusilli twist and pressing texture into the pasta nest
- a small flat oven tray lined with baking paper for the bake
Tip — choose your stoppers carefully: The wooden cork stoppers I used were food safe and intended for bottle use, but they were slightly too big for the bottles I tested. Visually they look great, but for the project to actually work end-to-end, choose a narrower-fit cork stopper — same wooden-topped style, slimmer cork base. Test the fit in an empty wine bottle before you start decorating, and don't shave the cork down to make it fit (more on that below).

welcome to my online studio of arts, crafts and everything in between! i post regular diy crafts here and over on my socials. pop your email in below and i'll send you the free air dry clay starter kit - plus new projects to your inbox every month.
the idea 💭
what if a wine stopper could feel like a tiny pasta night accessory?
this idea came from the very classic pairing of wine and pasta. I wanted to make something that felt easy enough to start and finish in one evening, but still special enough to give as a diy gift. the little striped wooden tops gave the whole thing a fun, almost-tableware feel before the pasta even went on — and once the four pasta shapes landed on top, the stoppers stopped looking like stoppers and started looking like the kind of thing you'd find in a tiny italian gift shop.
the pasta shapes were the bit that needed the most patience. the ravioli and farfalle bow read instantly, even at that tiny scale — the pasta nest and fusilli twist needed a few fiddly attempts before they looked properly pasta-y. wdyt?! by the time they were lined up in a row, painted yellow, and varnished to a glossy finish, the whole project felt much more 'proper handmade gift' than 'craft night experiment'.
the only snag was the stopper fit. I'd picked these wooden cork stoppers specifically because they looked beautiful — chunky cork, classic shape. they were sold as food safe and intended for bottle use, so I assumed they'd just… fit. they didn't. the cork was slightly too big for every bottle I tried, and once I'd painted, baked, glued and glossed four of them, I didn't really have the option of starting over.
the lesson: do the bottle fit test before you start decorating. don't try to shave the cork down — you'll compromise the food-safe finish and the stopper will leak.
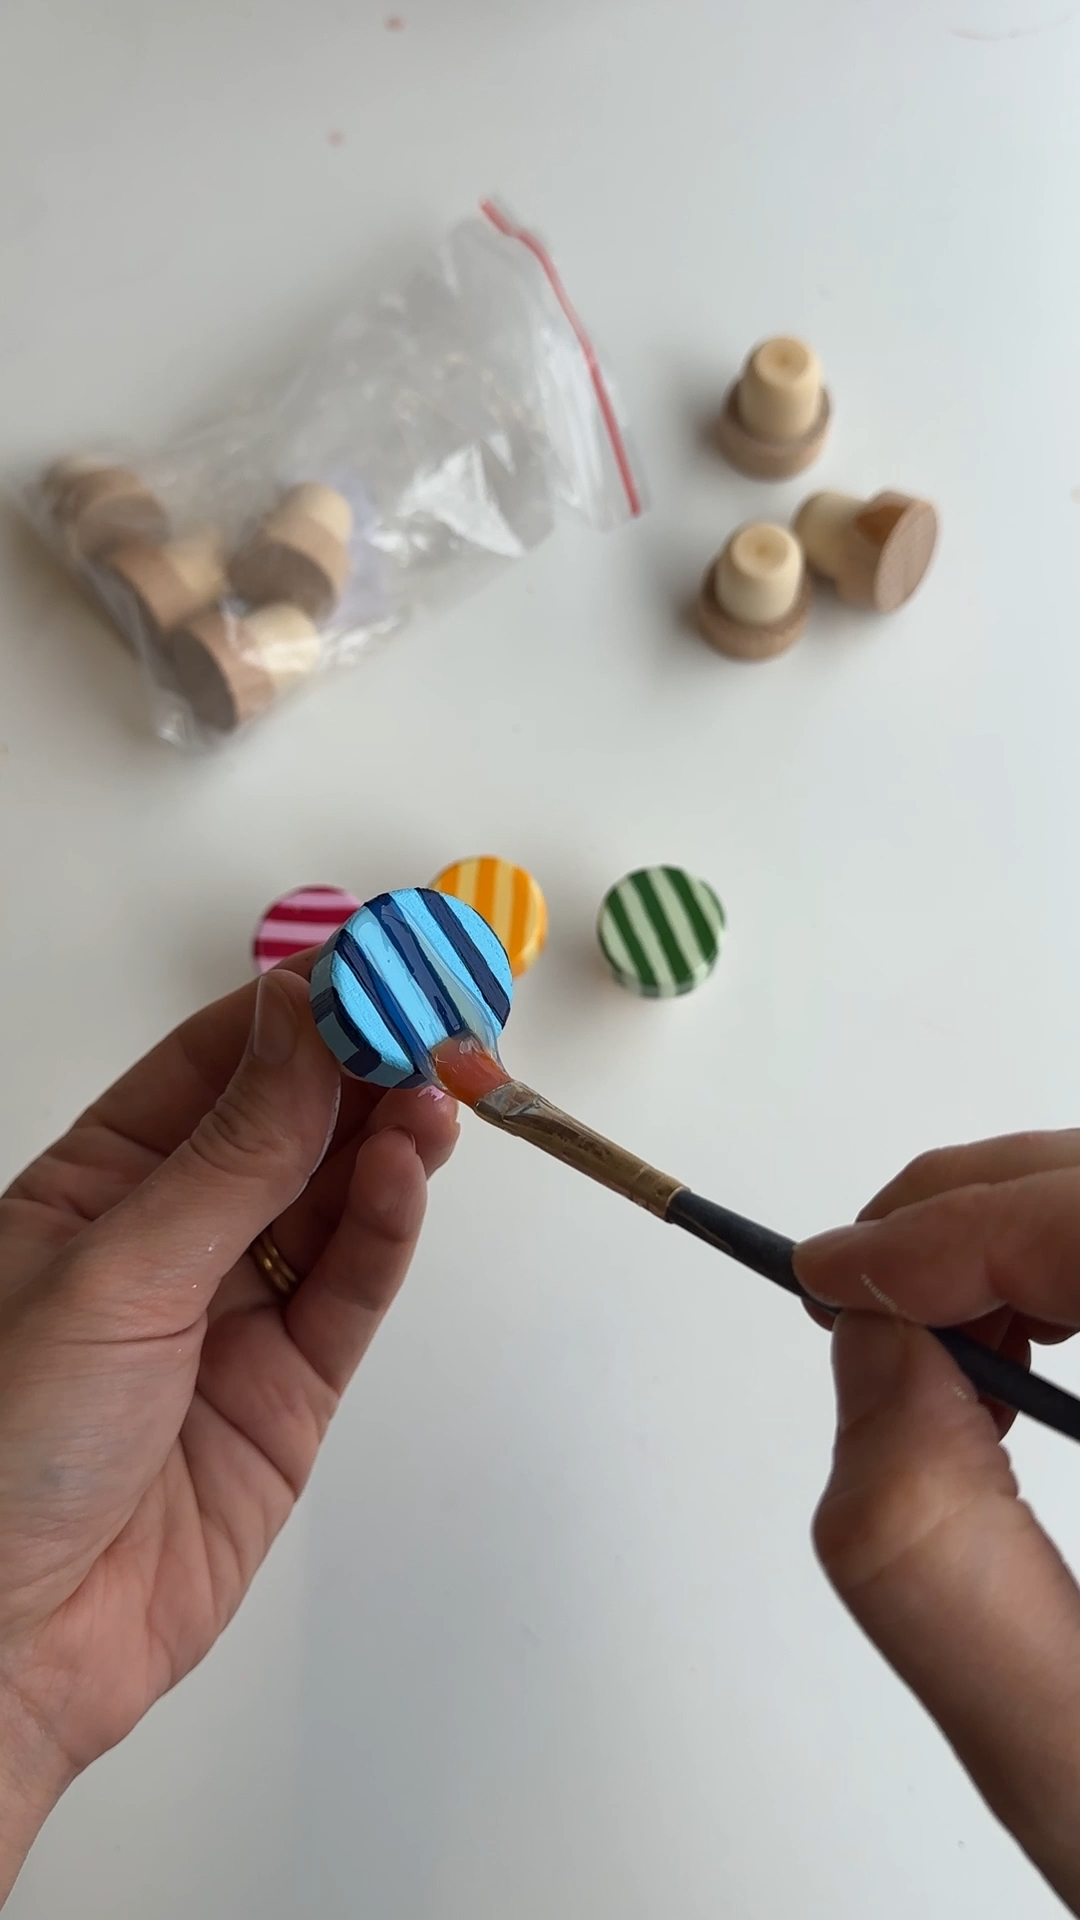
step 1: paint the stoppers for a striped base
start by painting the wooden tops of your wine stoppers with acrylic paint.
paint a lighter base colour first — cream, off-white or pale pink works really well — and let it dry fully. once the base is dry, add stripes in pink, green, yellow and blue using a fine brush, working around the curve of the wooden top so the stripes meet neatly at the back. don't worry about being perfectly even; a slightly hand-painted feel is exactly what gives them that bright, cheerful, almost-retro look.

step 2: gloss the painted tops for a finished look
once all four painted tops are dry, brush over hobbycraft gloss varnish in a single thin coat.
the gloss makes the colours feel richer, gives the wooden tops a nice shiny finish, and seals the stripes so they don't chip when the pasta piece is glued on top. one coat is usually enough — two thin coats is better than one thick coat if you want a really deep shine.
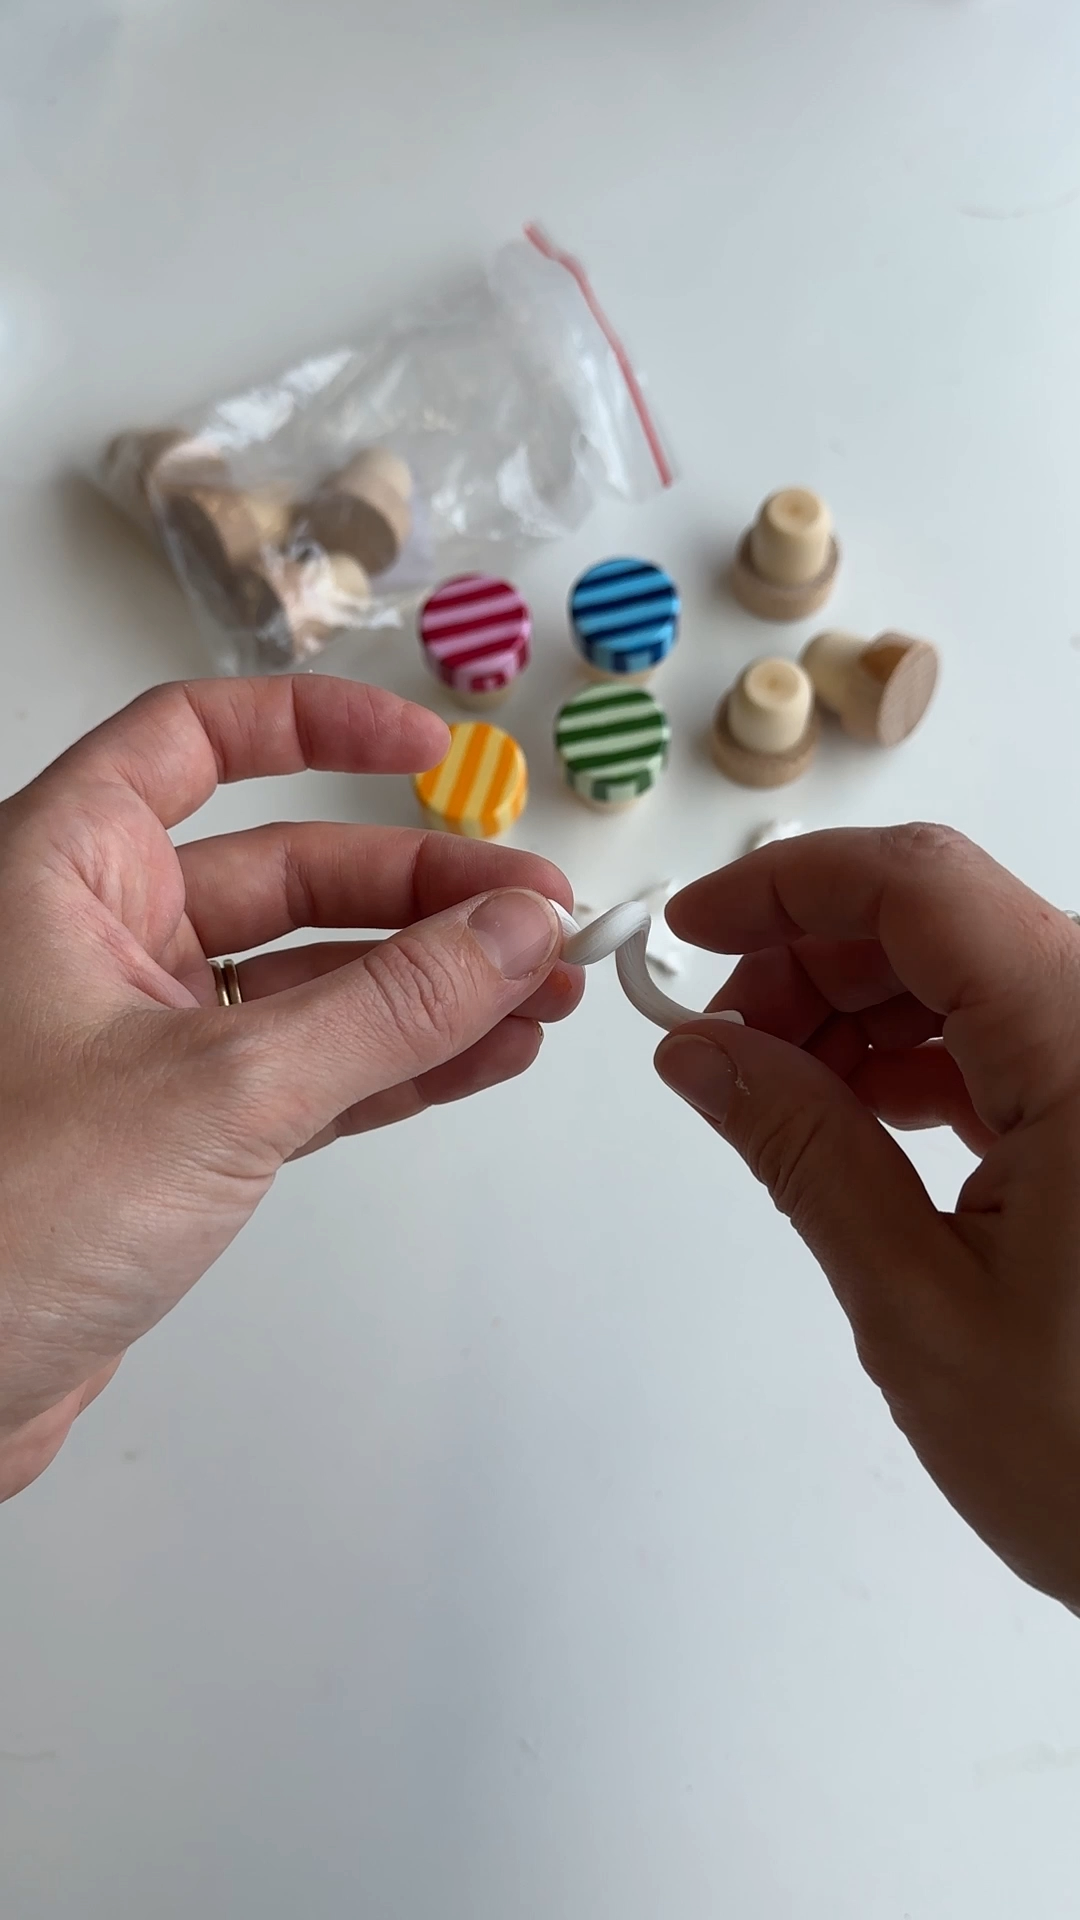
step 3: shape the four polymer clay pasta pieces
now for the bit that defines the whole project. you're making four pasta shapes, one for each stopper. work with clean, dry hands and a fresh patch of clay for each shape so the colours stay clean.
the four shapes (in the order they appear in the finished line-up — top left, top right, bottom left, bottom right) are:
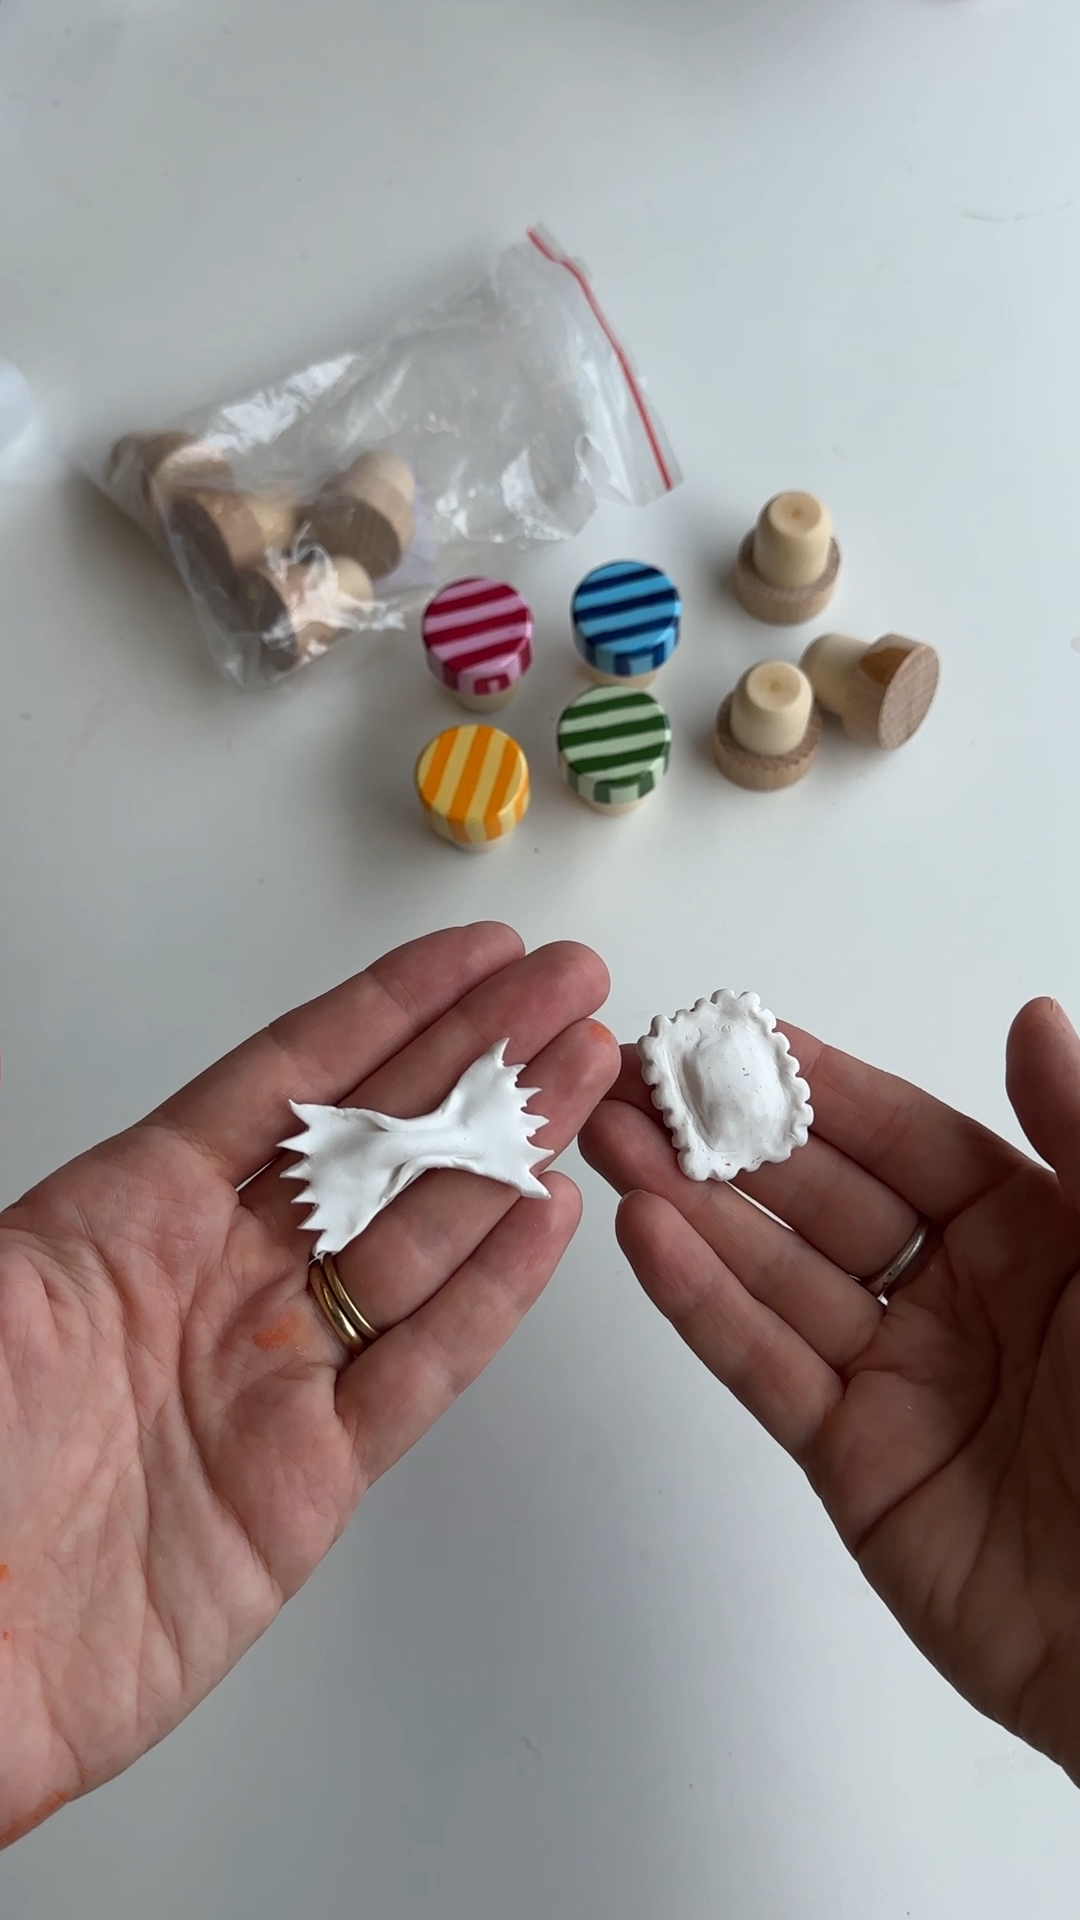
- ravioli (top left) — roll a small ball of clay, flatten it into a little square or rounded pillow, and gently press a fork or cocktail stick around the edge to create that classic crimped ravioli look. give it a slight dome on top so it reads as filled.
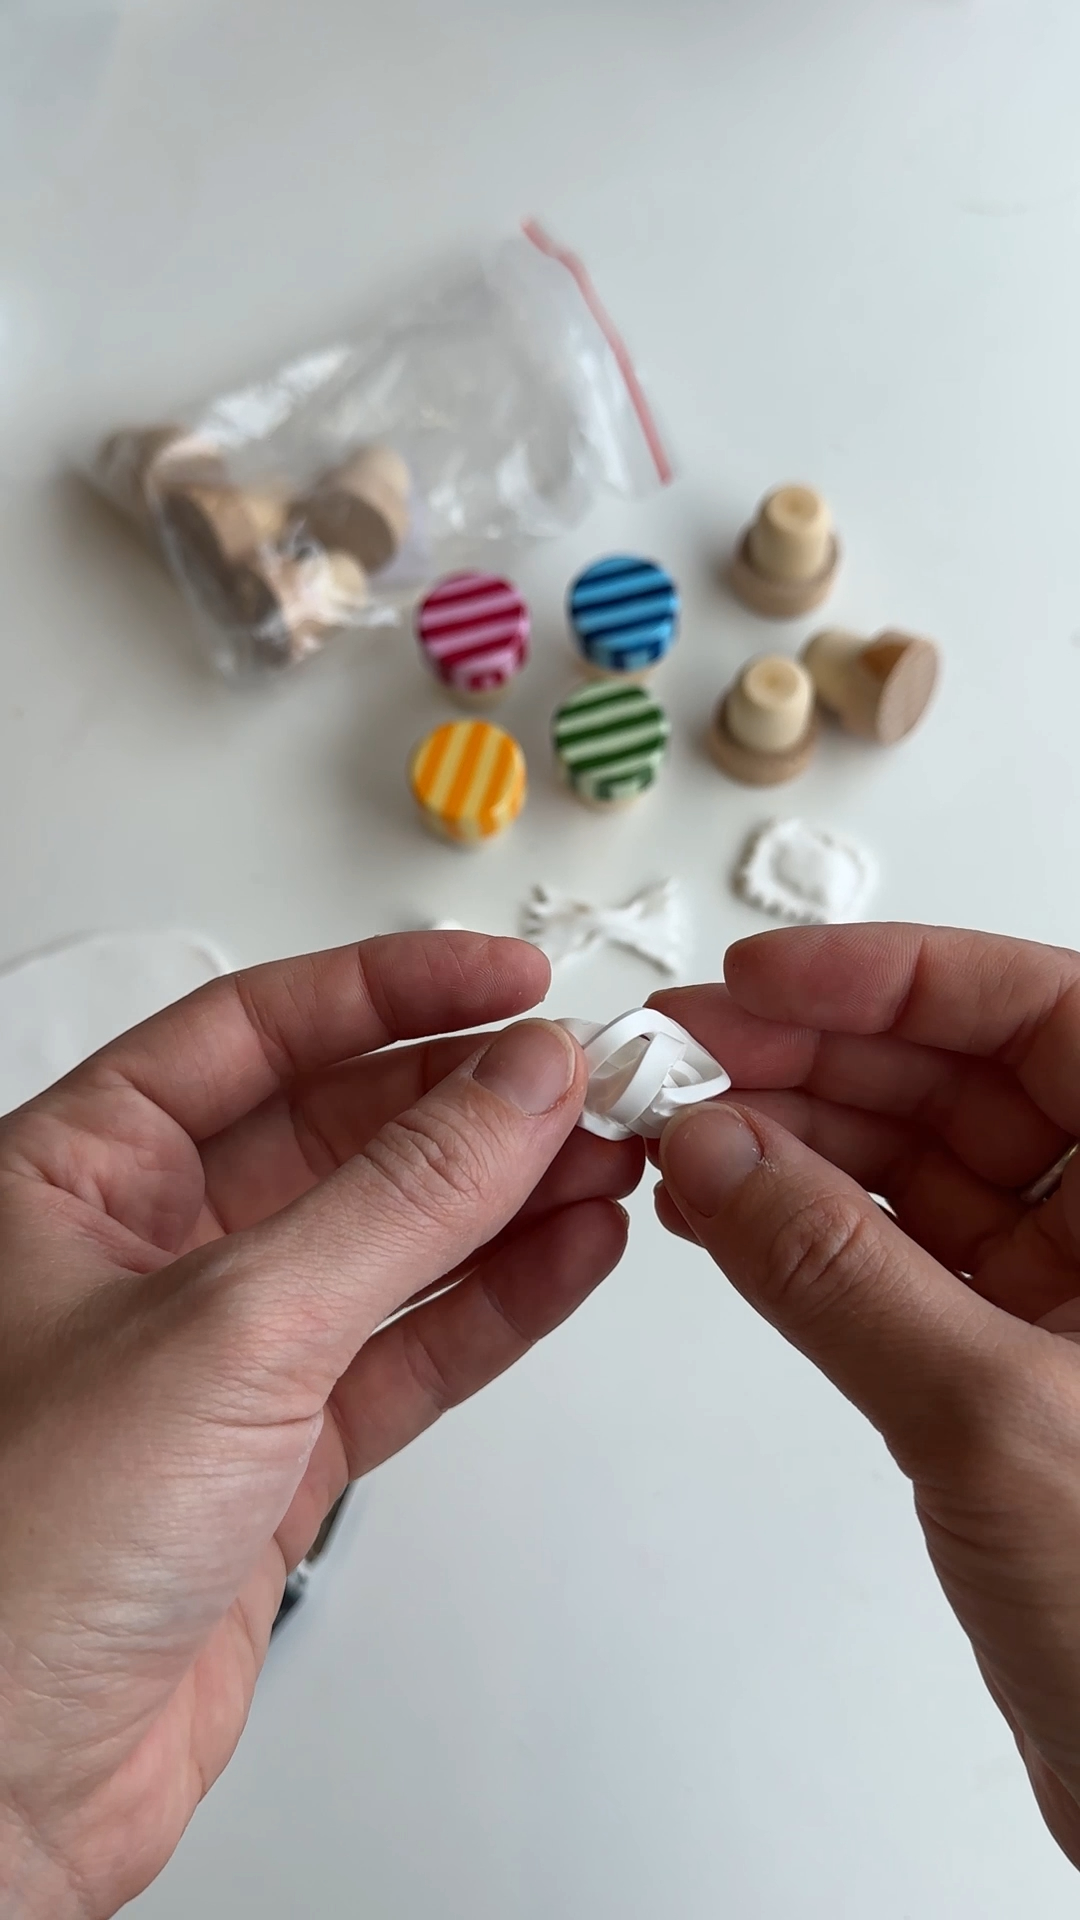
- tagliatelle / pasta nest (top right) — roll several thin, slightly uneven clay threads (around 1–2mm thick) and coil them loosely into a small nest shape. don't make it too neat; a real pasta nest has a bit of wildness to it.
- fusilli / spiral (bottom left) — roll a thin tapered rope of clay and twist it gently around a cocktail stick to set the spiral, then slide it off carefully so the spiral holds its shape. press the ends in slightly so it doesn't unravel.
- farfalle / bow-tie (bottom right) — flatten a small rectangle of clay, pinch the middle hard with your fingers (or with a cocktail stick) to make the bow-tie waist, and use the cocktail stick to press tiny pinch-marks into the wing edges so it reads as ridged.
Tip: make the shapes slightly chunky rather than too thin. tiny delicate edges look beautiful raw, but they're fiddly to paint and they snap really easily once baked. err on the side of robust.
step 4: bake the polymer clay
when all four shapes are ready, line them up on a flat oven tray lined with baking paper. don't let them touch.
bake the polymer clay using the temperature and time on the hobbycraft (or your chosen brand) packet — usually around 110–130°C for 15–30 minutes, but always check your specific clay. underbaking leaves the pieces brittle; overbaking turns them brown.
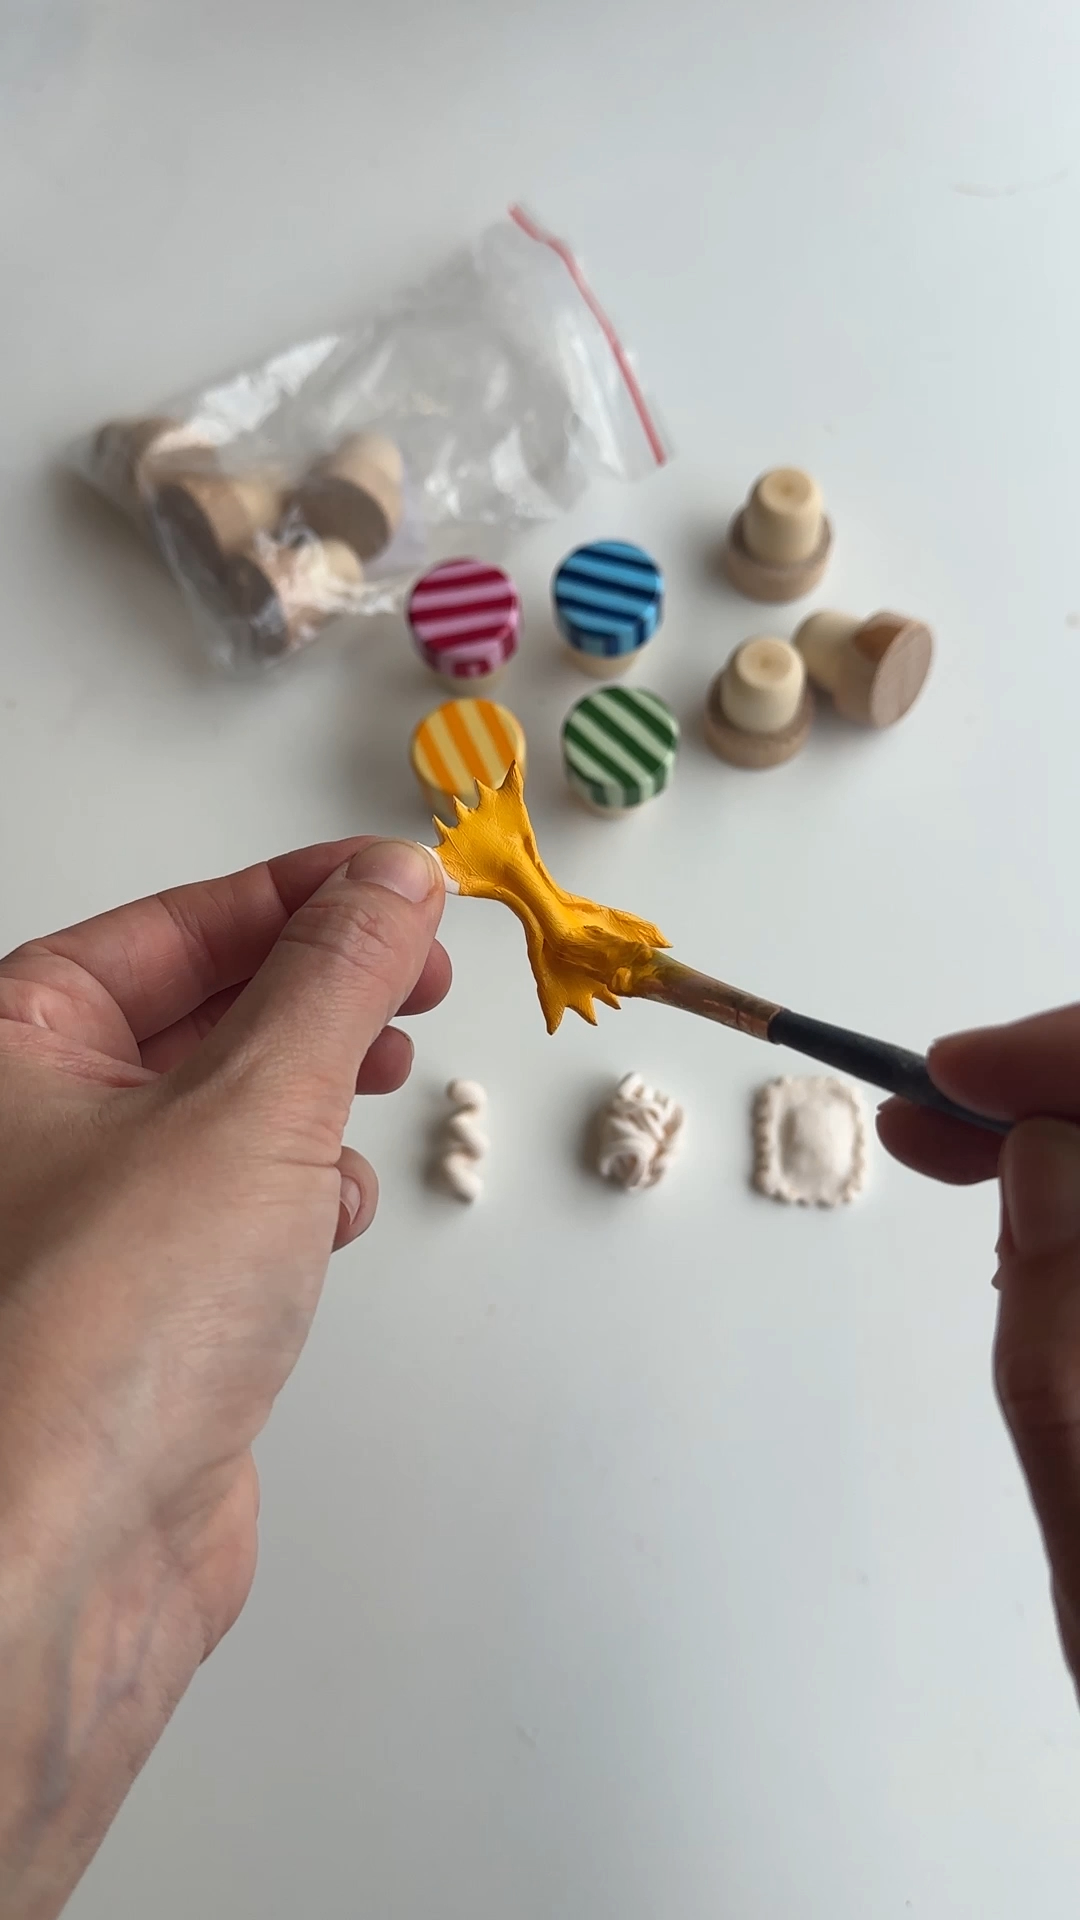
step 5: paint the baked pasta shapes
once the pieces have cooled fully (don't rush this — they're brittle when warm), paint them with the warm pasta yellow.
a single coat is usually enough; two thin coats if you want a richer colour. while the yellow is still slightly wet, add tiny details if you want them — a hint of white crumb on the ravioli edge, a slightly darker tone on the underside of the pasta nest to show shadow, a tomato-red dot on the farfalle middle to suggest a hint of sauce. let the paint dry fully before moving on.
step 6: gloss the pasta and glue to the stoppers
when the yellow paint is fully dry, add a coat of hobbycraft gloss varnish to each pasta shape and let it dry.
then use super glue — a small dot of gel-formula glue is plenty — to attach each pasta piece to the top of a painted stopper. press gently for ten seconds, and leave them to set fully (at least an hour, ideally overnight) before testing the fit. think about which pasta shape lands on which stopper colour — sometimes the brightest pasta looks best on the softest stripes, and sometimes the opposite.

step 7: test the bottle fit
once everything has dried and set, test the stopper in an empty bottle one more time.
the stopper shape is gorgeous for this project, but as I learned the hard way, the specific brand I used was too big for the bottles I tested. I don't recommend shaving them down — it compromises the food-safe finish and the cork will leak. if you've followed the tip in 'what you'll need' and used a narrower-fit stopper from the start, this step is just a final check. if not, see the troubleshooting section below.
Watch out: always check the fit before making a full batch, especially if these are being given as gifts. it's much better to find a fit issue on one prototype than on six finished gifts.

the verdict 👩⚖️
the pasta shapes make these feel so much more fun than a plain bottle stopper. the ravioli and farfalle are especially satisfying because they read instantly as pasta, even at a tiny scale, and the fusilli + tagliatelle nest pair adds a bit of texture and movement so the four-stopper set doesn't feel too samey. lined up in a row in a small gift box, they genuinely look like something you'd buy in a little italian homeware shop.
the main thing I'd change is the stopper itself. the wooden cork shape works really well visually, but the fit needs to be right from the start — so next time, same style, different brand, narrower cork. that's the only real fix this project needs. everything else (paint, clay, varnish, gluing, baking) was very forgiving even for a polymer clay beginner.
yes — hobbycraft polymer clay works really well for the small decorative pasta shapes. bake it using the recommended temperature and time on the packet, and don't substitute air dry clay if you can help it (more on that below).
you can, but it's not ideal. polymer clay bakes to a really solid finish and holds tiny details (the ridges on a farfalle, the threads of a tagliatelle nest) much better than air dry clay, which tends to crack or soften delicate edges as it dries. for this project specifically, polymer clay is the right shout.
yes, if you've used a good gel-formula super glue, scuffed the gloss varnish lightly where the pasta sits, and given the glue time to cure fully (at least 24 hours before any rough handling). if a pasta piece does pop off, a single drop of fresh glue will re-attach it cleanly.
in a small box or fabric pouch, ideally with each stopper sitting upright so the pasta shape isn't pressing against anything. avoid leaving them in direct sunlight for long periods — acrylic paint can fade slightly over years of strong light.
hobbycraft's own polymer clay is great and what I used here. sculpey iii and fimo soft are both very beginner-friendly too — both bake at low temperatures, both come in lots of colours, and both hold fine detail. avoid the harder polymer clays designed for caning (like premo or kato) for your first project — they need more conditioning.
- decorating all four stoppers before testing the bottle fit — do the empty-bottle test first, on an undecorated stopper
- painting or glossing before the previous layer is dry — patience here saves a smudged stripe or cloudy varnish
- making the polymer clay pasta shapes too thin or fragile — they look pretty raw but snap easily once baked
- using too much super glue — a small drop is plenty; excess seeps out around the edges and frosts the gloss
more like this
looking for more DIY inspiration? Take a look at some other projects I've done similar to this one.
join my monthly craft club
pop your email in and i'll send you the free air dry clay starter kit - plus a monthly drop of new bits, behind-the-scenes chaos, and ideas to brighten your brain.