diy crumbl-inspired cookie coasters gift box
a playful handmade birthday gift for the friend who is completely cookie obsessed — six clay cookies nestled inside a soft, ring-box-feel gift box 🎁🍪
🎁 makes such a thoughtful birthday gift — the box is the whole moment
🍪 playful, recognisable and full of tiny details
🎨 easy to customise with whichever cookie flavours your friend is obsessed with
💗 the cushioned interior makes it feel properly boutique
🪄 works as a “make over a weekend” project — most of the time is just drying
make a six-piece crumbl-inspired cookie coaster gift box using air dry clay, acrylic paint, and a painted wooden box with a soft cushioned interior. the cookies sit inside little fabric channels like jewellery, so opening it feels less “six coasters in a wooden box” and more “oh my goodness you actually made me a treat box”.
this tutorial covers the box build, the cushioned insert, and the first cookie design — the classic pink confetti sugar cookie. the same coaster technique works for any flavour, so you can build out a full six-piece line-up in your friend’s favourite cookies (more flavour tutorials coming soon — full line-up at the bottom of the post).
- wooden box (around 25cm × 34cm × 12cm — more on height in a sec 👇)
- pink acrylic paint (or your friend’s favourite colour)
- black acrylic paint (for the logo on the lid)
- foam — three rolls’ worth to make the padded channels
- pink fabric to cover the foam (a soft cotton or jersey works lovely)
- air dry clay (around 500g for a six-cookie box)
- acrylic paint in the cookie + icing colours of your choice
- small paintbrushes — a fine detail brush is properly worth it for the sprinkles
- jdiction gloss sealer (or any clear acrylic gloss sealer)
- protective surface / craft mat
- rolling pin and a round cutter (or anything 10cm and circular)
- pencil + a ruler for sketching the lid logo
box height tip: go for a 12cm tall box rather than 11cm if you’re buying one specially. I used 11cm and closing the lid over the cushioned insert + coasters was honestly a faff. an extra 1cm gives the foam room to breathe, and the lid closes properly without squashing the soft interior.
Welcome to my online studio of arts, crafts, and everything in between! I post regular DIY crafts here as well as on my social channels to help give everyone of every skill-level the opportunity to create beautiful, handmade gifts and decorations. If you want regular projects delivered to your inbox, use the form below, or follow me on socials!
the idea 💭
my friend is crumbl cookie obsessed. like, regularly-tells-me-what-flavour-just-dropped levels of obsessed. so for her birthday I wanted to make something that felt funny, personal, and properly useful — not “oh, thanks” useful, but “oh my goodness I’m going to leave these out all the time” useful.
the obvious bit was the cookie coasters. the less obvious bit — and the bit that I think actually makes this project — was the box. I didn’t want to hand her six coasters loose in tissue paper. I wanted the whole thing to feel like opening a proper treat box, but softer and more special. almost like a ring box for cookies. (yes I know how that sounds. yes I’m sticking with it.) 💍🍪
the first design was the classic pink confetti sugar cookie because it is just so recognisable — the second you see that pink swirl and the rainbow sprinkles, your brain goes “oh, crumbl”. the slightly risky part was getting the raised icing swirl to look like a cookie but stay flat enough to actually function as a coaster. (spoiler: 6–7mm of raised swirl works. anything taller and your cup wobbles.)
so the plan was simple — build the box first, perfect one cookie design, then keep adding flavours until the full six-piece box is ready 🎂
step 1: paint the box into a giftable base
start by painting the wooden box pink all over — sides, lid, inside, the lot. two thin coats give a much cleaner finish than one thick one, and a sanding-sponge pass between coats helps if the wood grain is showing through.
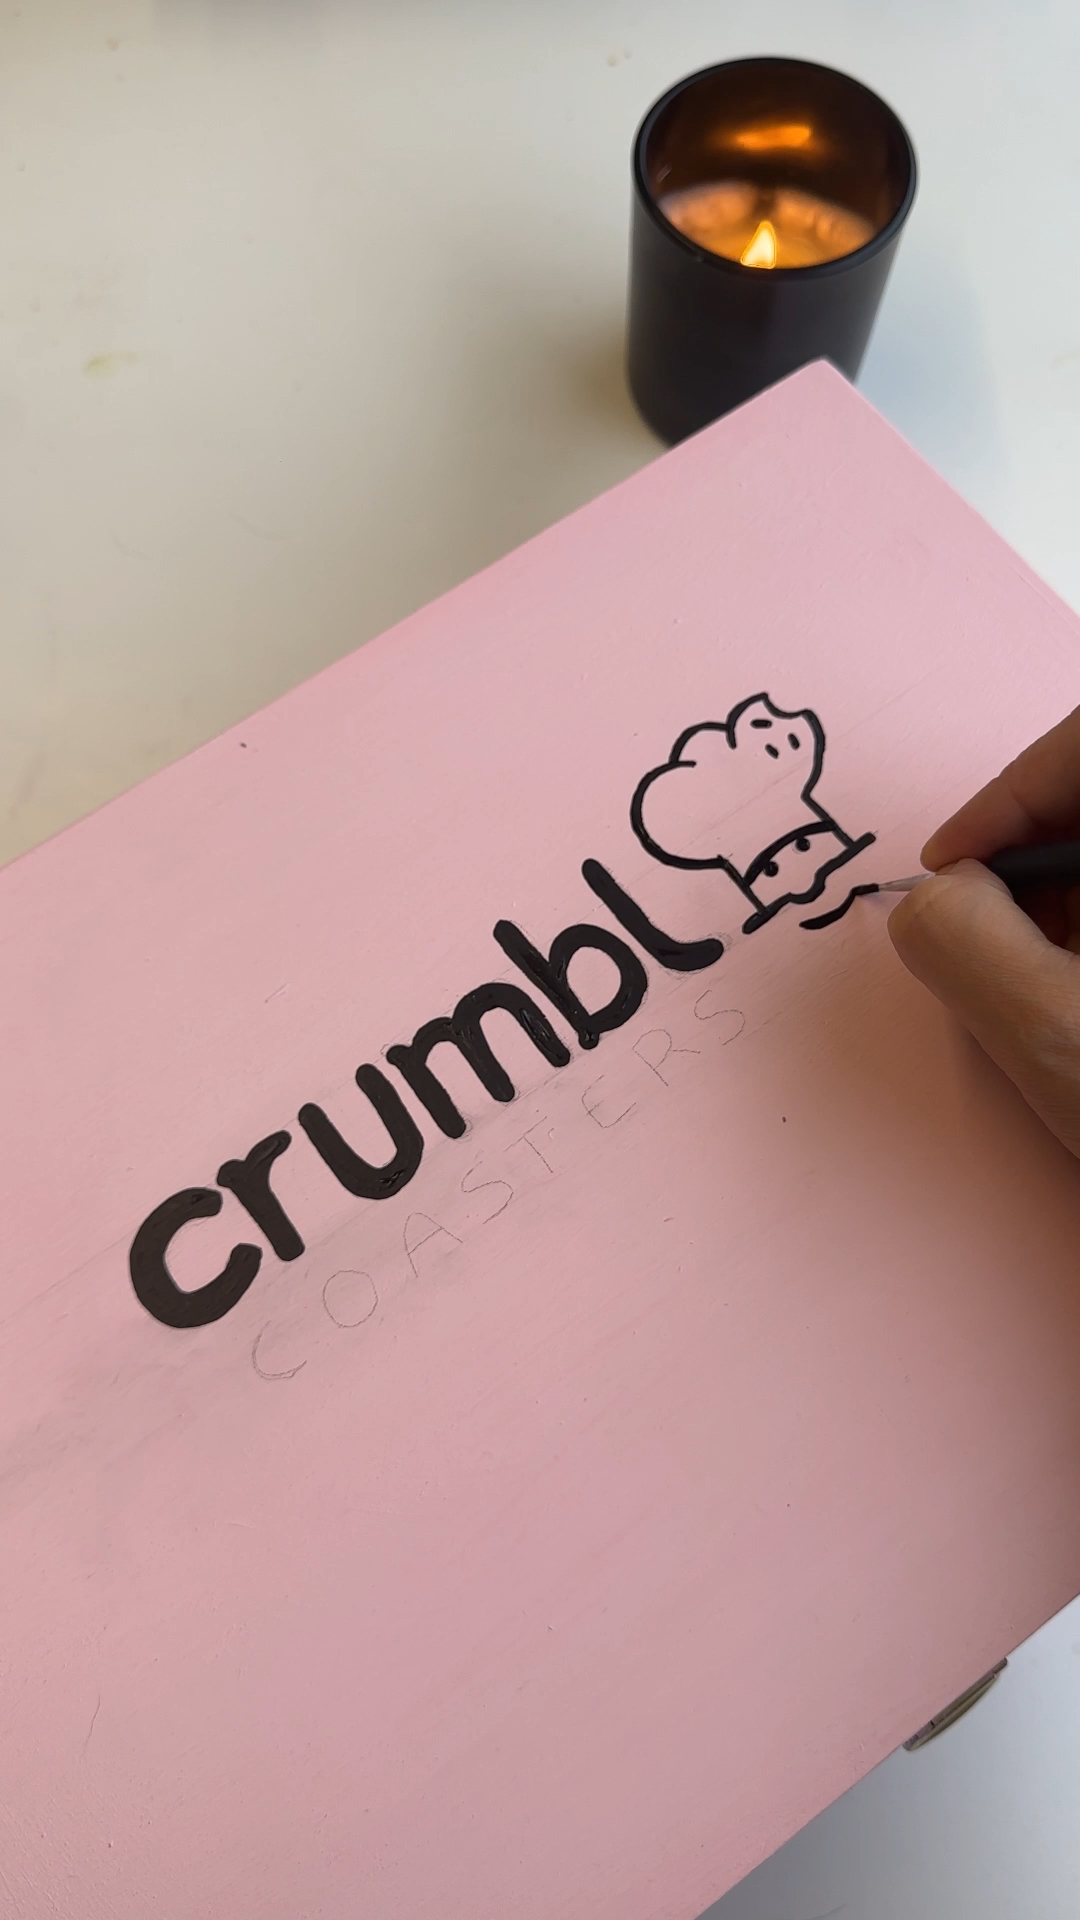
once the pink base is fully dry, sketch a crumbl-inspired logo outline onto the lid in pencil first (much less stressful than going straight in with paint). then fill it in with black acrylic. I’d say swap the original wording for something personal — your friend’s name, an inside joke, “[name]’s cookie box”, or just a sweet little phrase that fits the gift.
tip: if pencilling the logo feels fiddly, print the lettering at the right size, place it on the lid, and use a soft pencil on the back of the page to transfer the outline (carbon-paper style). zero freehand stress.
step 2: build a cushioned interior for the coasters
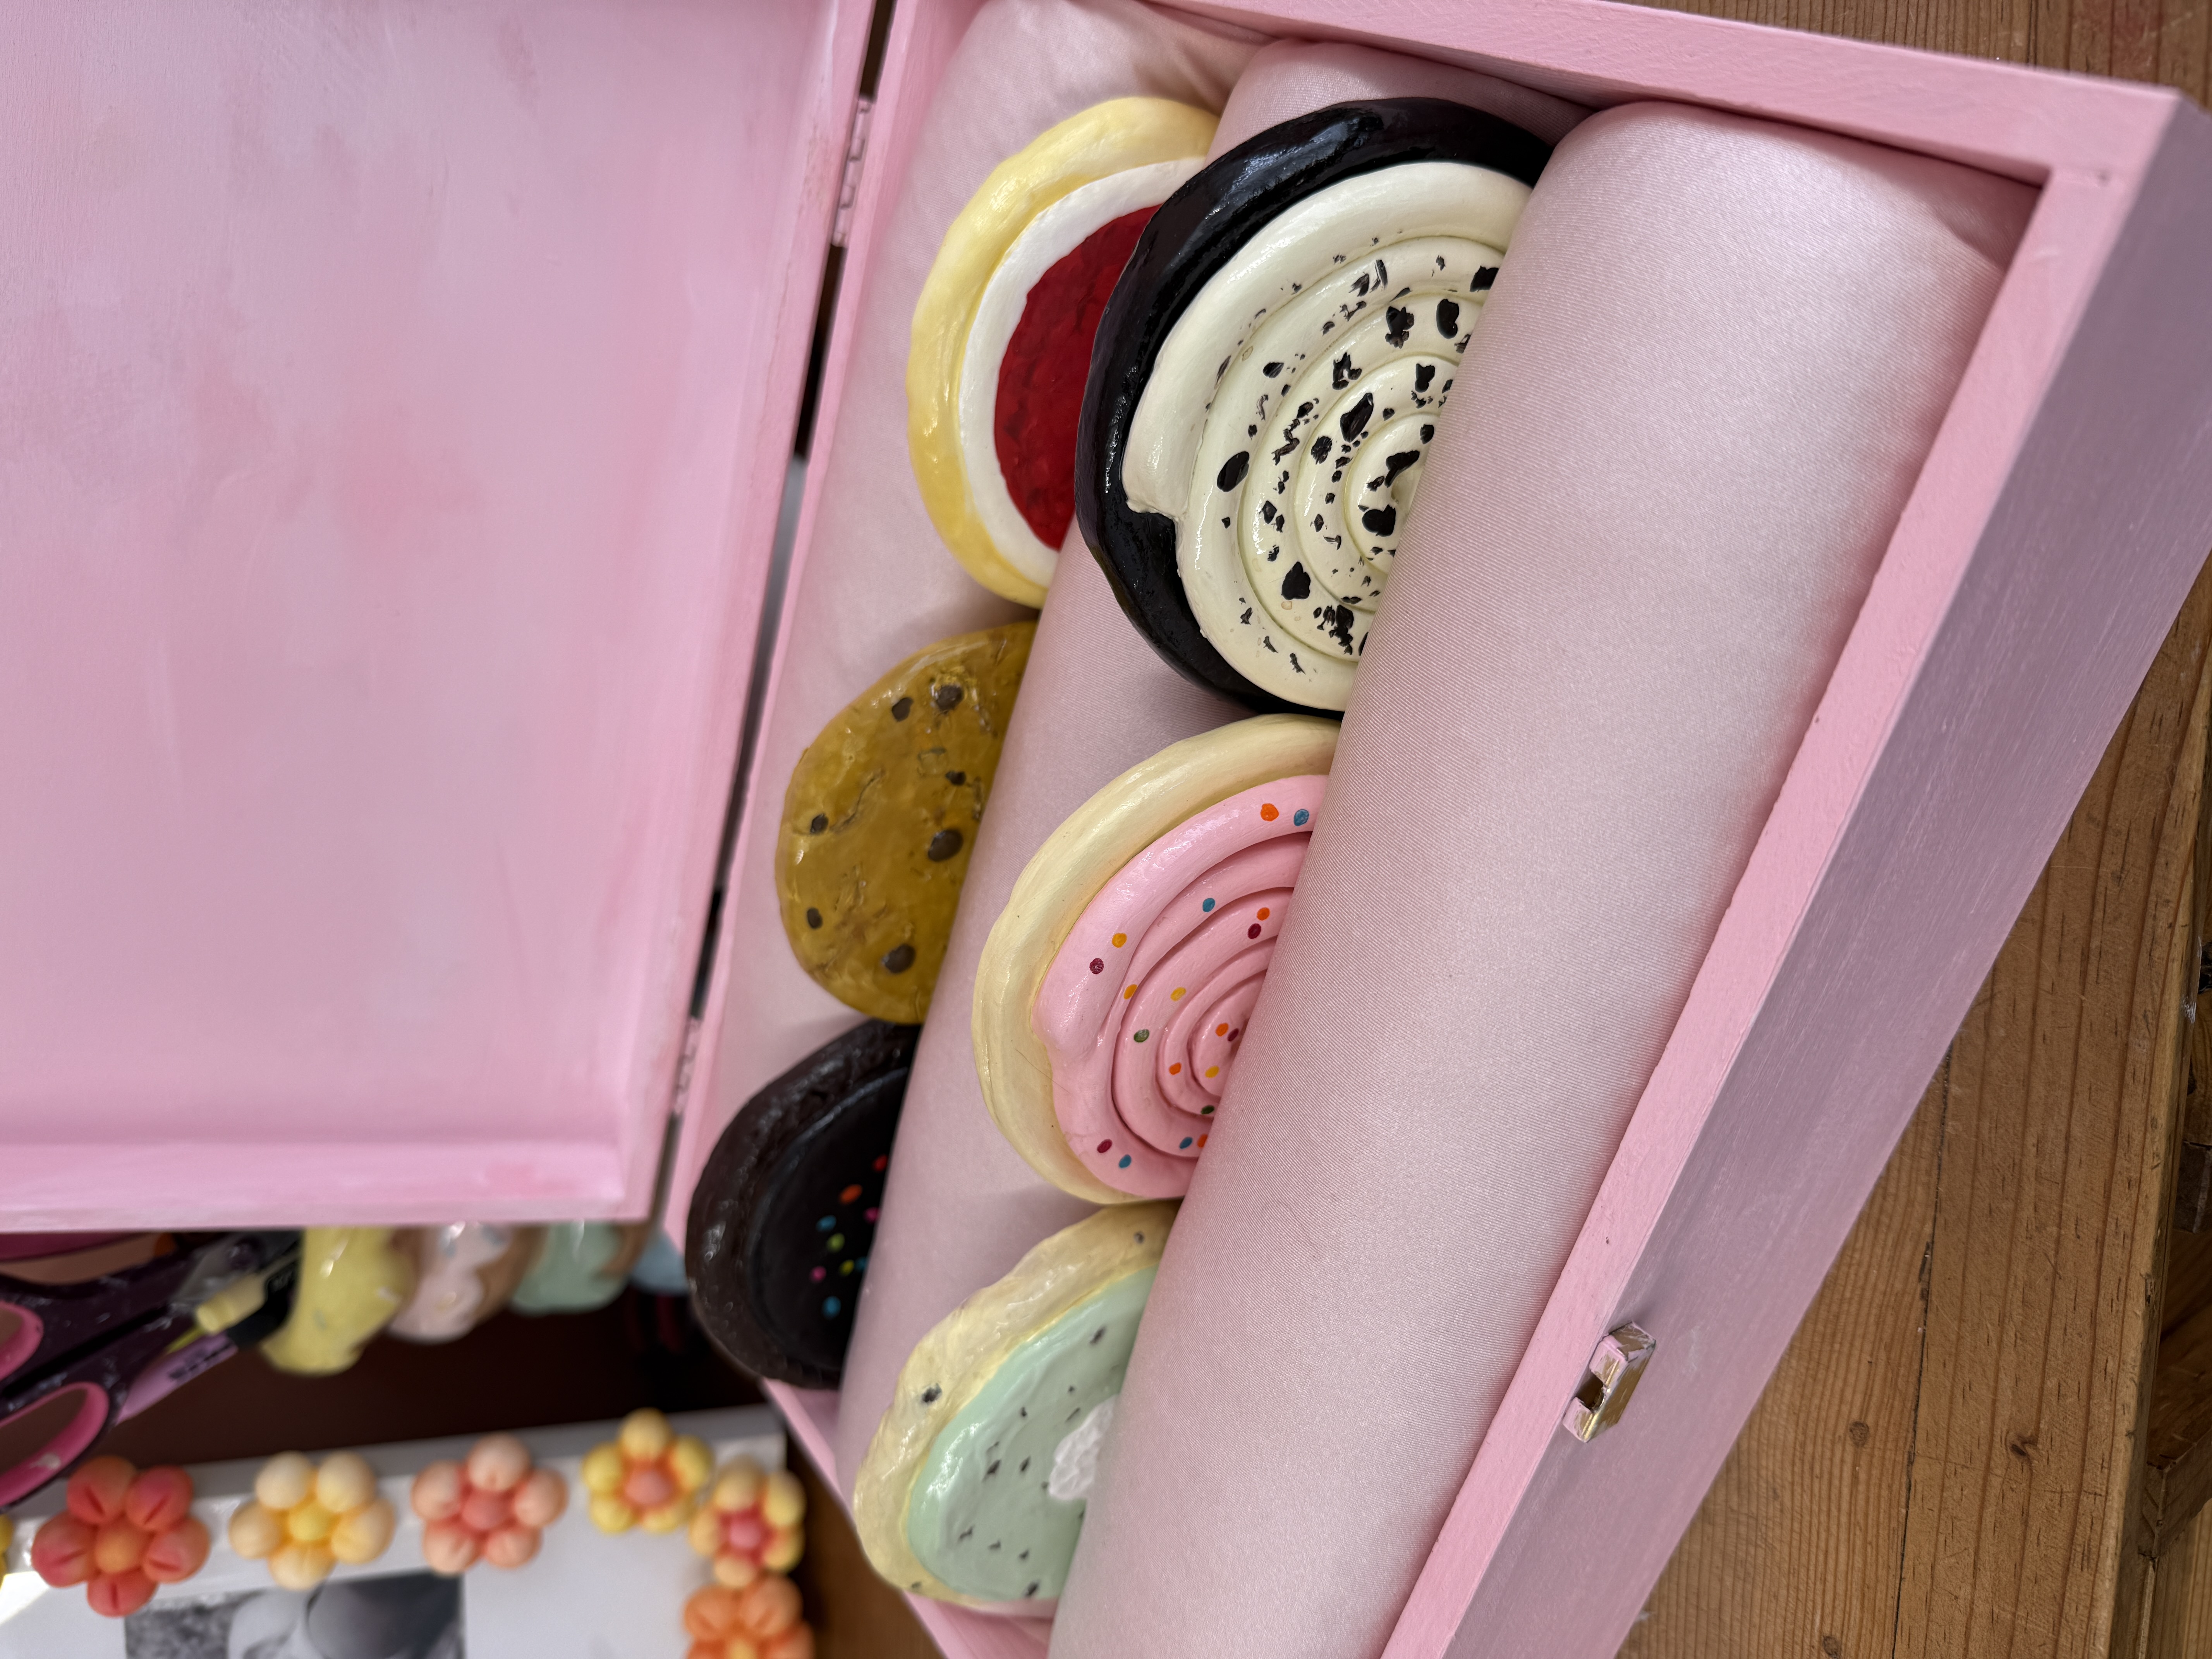
roll up three pieces of foam into long sausages and place them inside the wooden box, sitting parallel to each other. these create the padded channels for the coasters to nestle between — two coasters per gap, six coasters total.
cover the foam with your pink fabric, tucking it neatly down between the rolls and along the box edges so the inside feels soft and finished, rather than just packed with stuffing.
this is the bit that genuinely makes the box feel premium. it’s the ring-box moment when the lid lifts and the inside is all pillowy and pink, instead of a flat wooden floor.
tip: tuck the fabric tightly around each foam roll so they still look soft and rounded, but not bulky. you can tack the corners down with a tiny dot of pva or fabric glue if it keeps shifting.

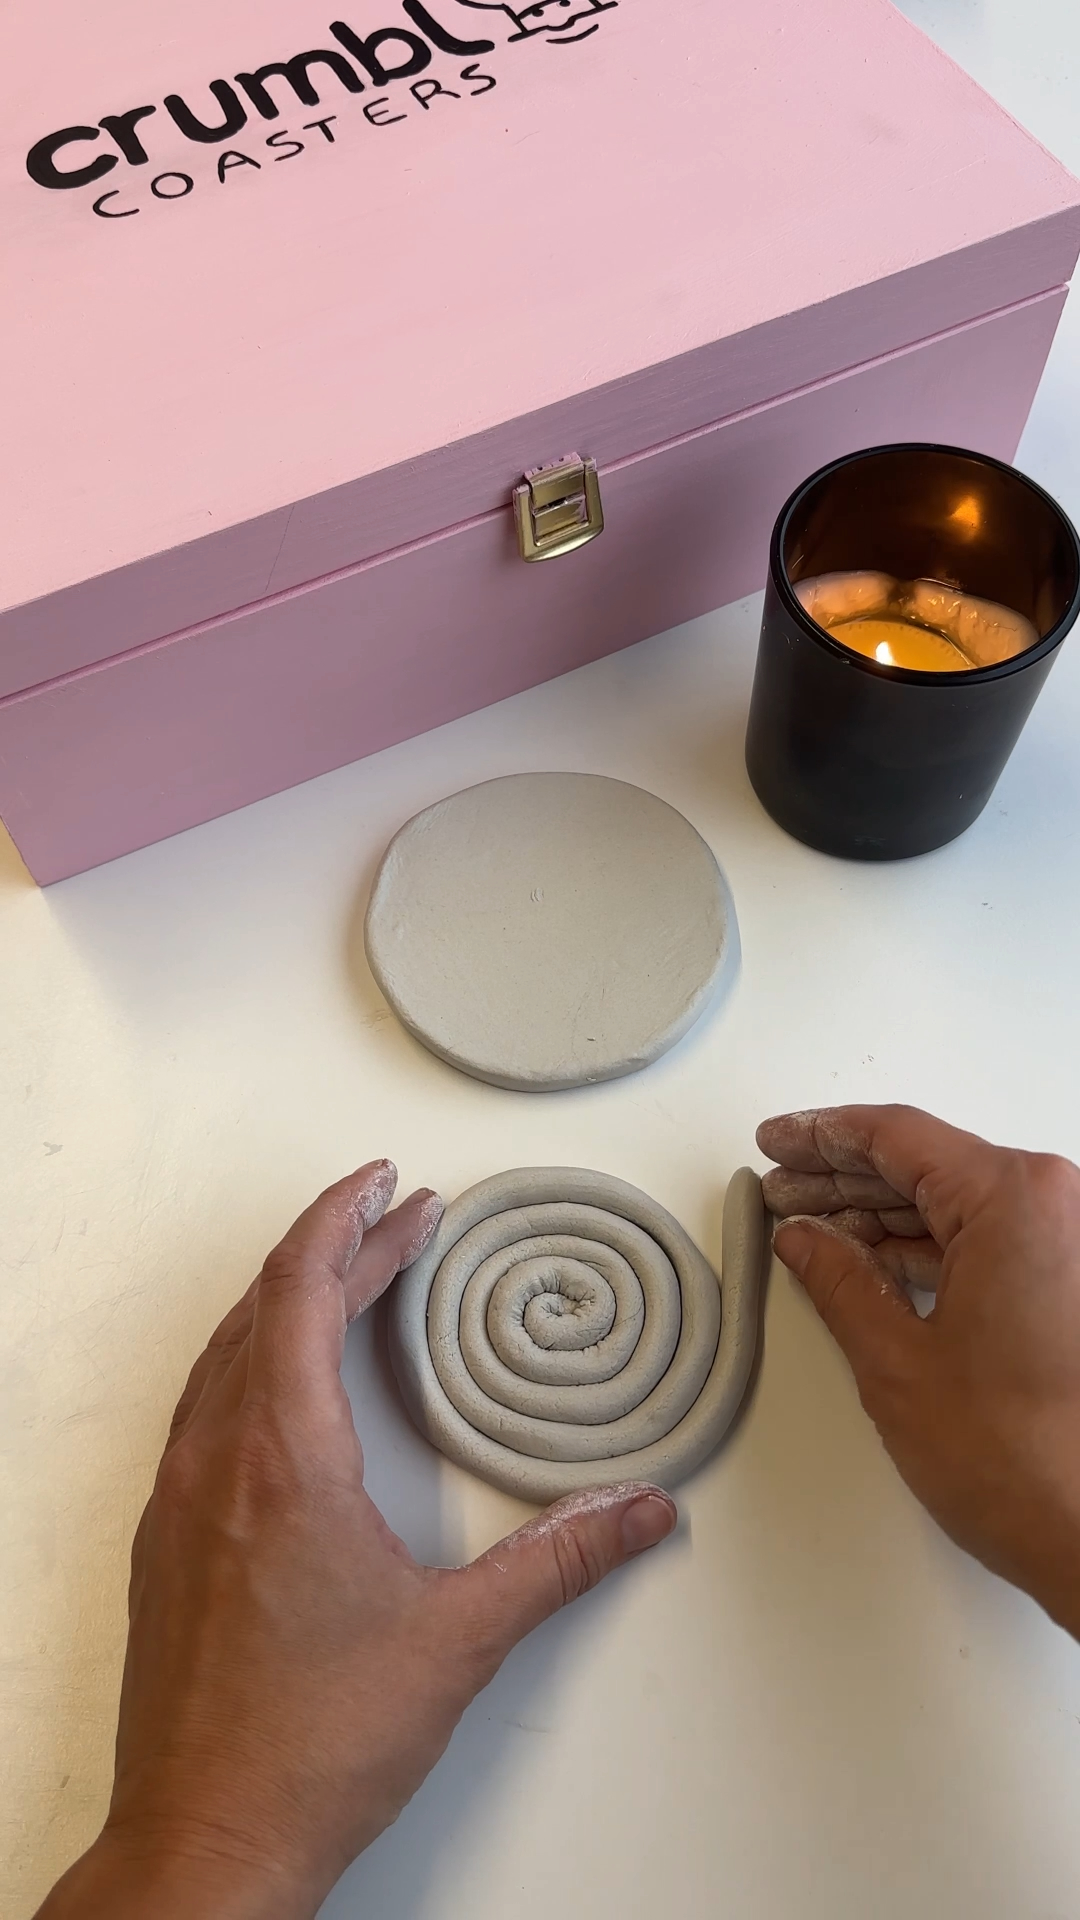
step 3: shape the first cookie coaster
roll out your air dry clay on a craft mat and shape a 10cm round cookie base — around 8–9mm thick. you want it sturdy enough to actually act as a coaster, but not so chunky it weighs the box down once you’ve got six in.
then add a swirl of clay on top to create the icing shape. roll a long thin sausage of clay, then coil it from the outside in, finishing in a soft little peak at the centre. aim for around 6–7mm thick — raised enough to read as icing, low enough to keep cups stable.
smooth any rough edges gently with a damp finger before leaving it to dry.
watch out: don’t make the raised icing too tall, or cups will wobble when the coaster is being used. if your swirl is sitting taller than ~7mm, gently press the centre down before drying — much easier than fixing it later.
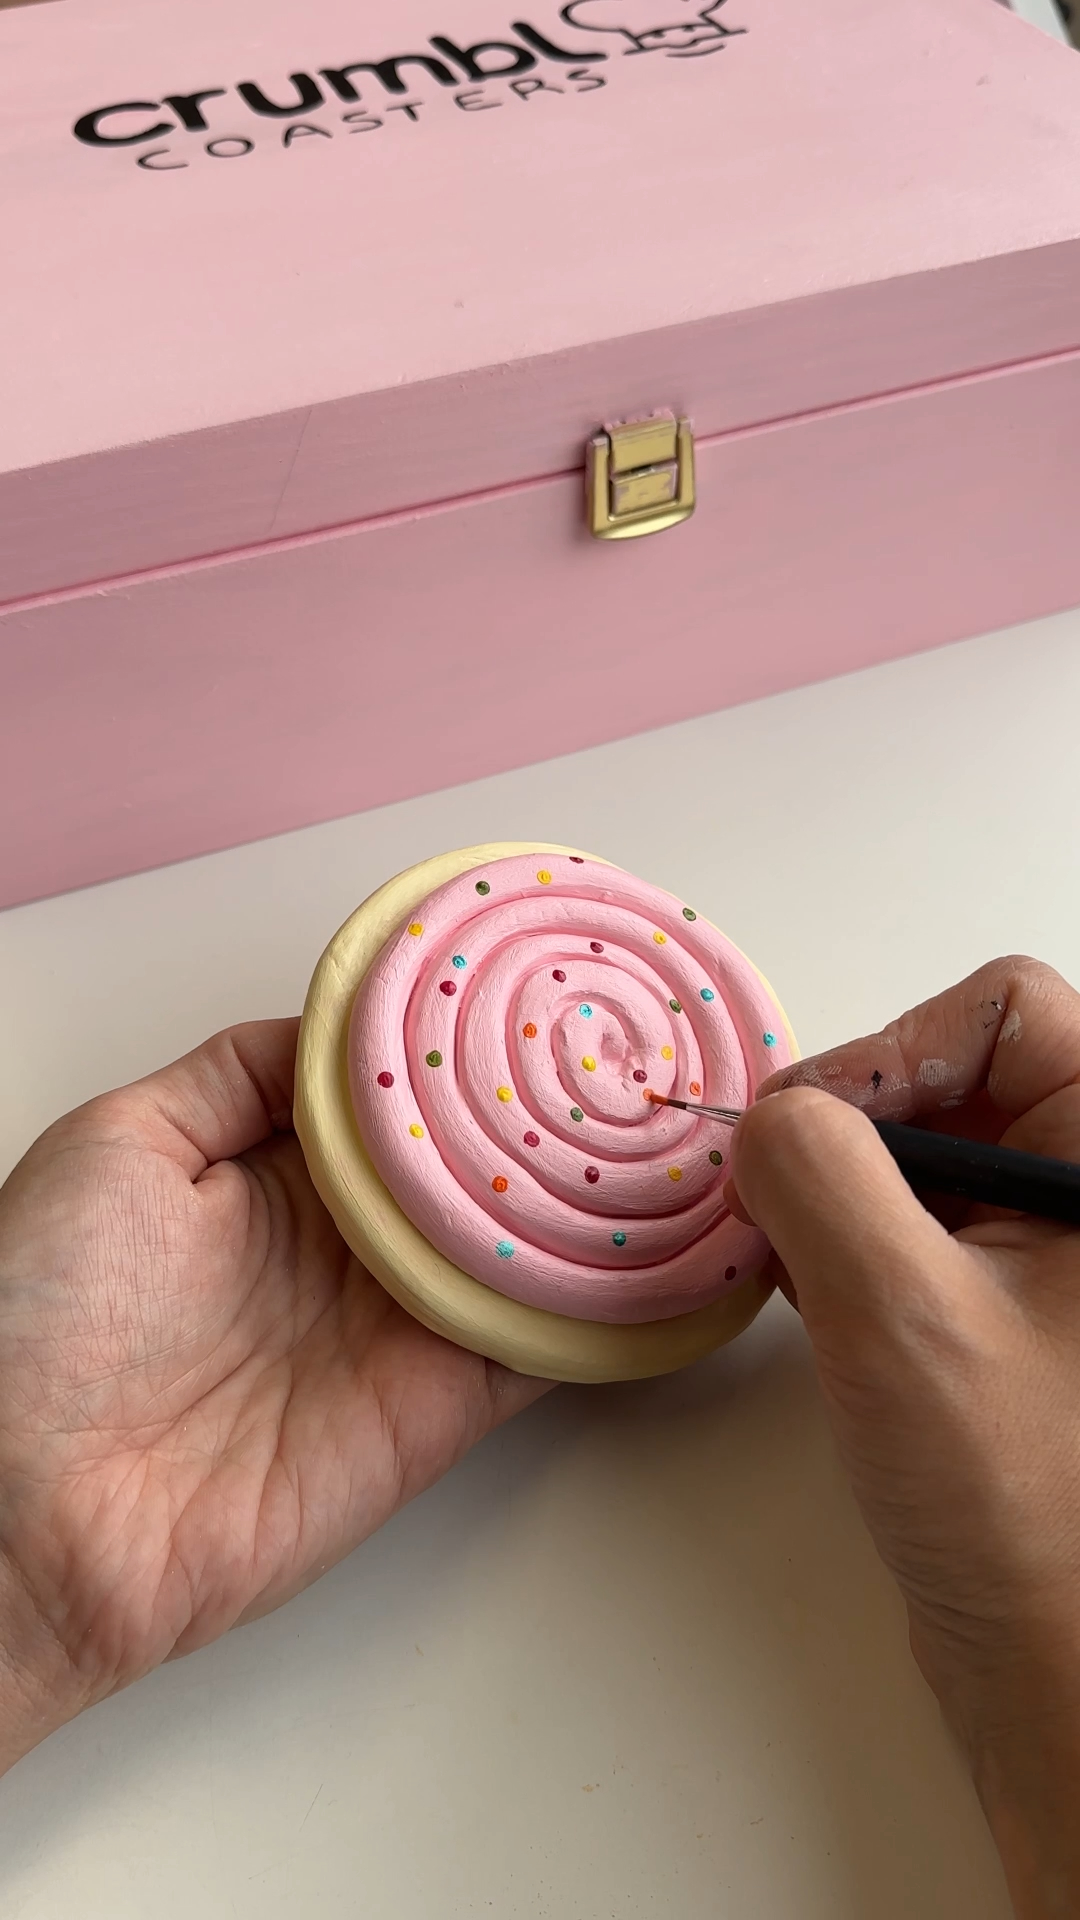
step 4: dry and paint the cookie details
leave the coaster to dry fully before painting. these were left for 48 hours, which worked well for medium pieces at room temperature. the clay should feel cool to the touch (not damp), and the underside should be just as dry as the top.
once dry, paint the base in a warm cookie colour — think soft beige, sandy tan, or a buttery cream depending on the cookie. for the pink confetti, paint the icing swirl pink (two thin coats for a flat, even finish), then add little confetti sprinkle details over the top with a fine brush.
let each colour dry before adding the next so the sprinkles stay crisp instead of smudging into the pink underneath.
tip: if you want extra-cute sprinkles, use the back end of your paintbrush dipped in paint for the round confetti dots — much more uniform than trying to dot with the brush tip.
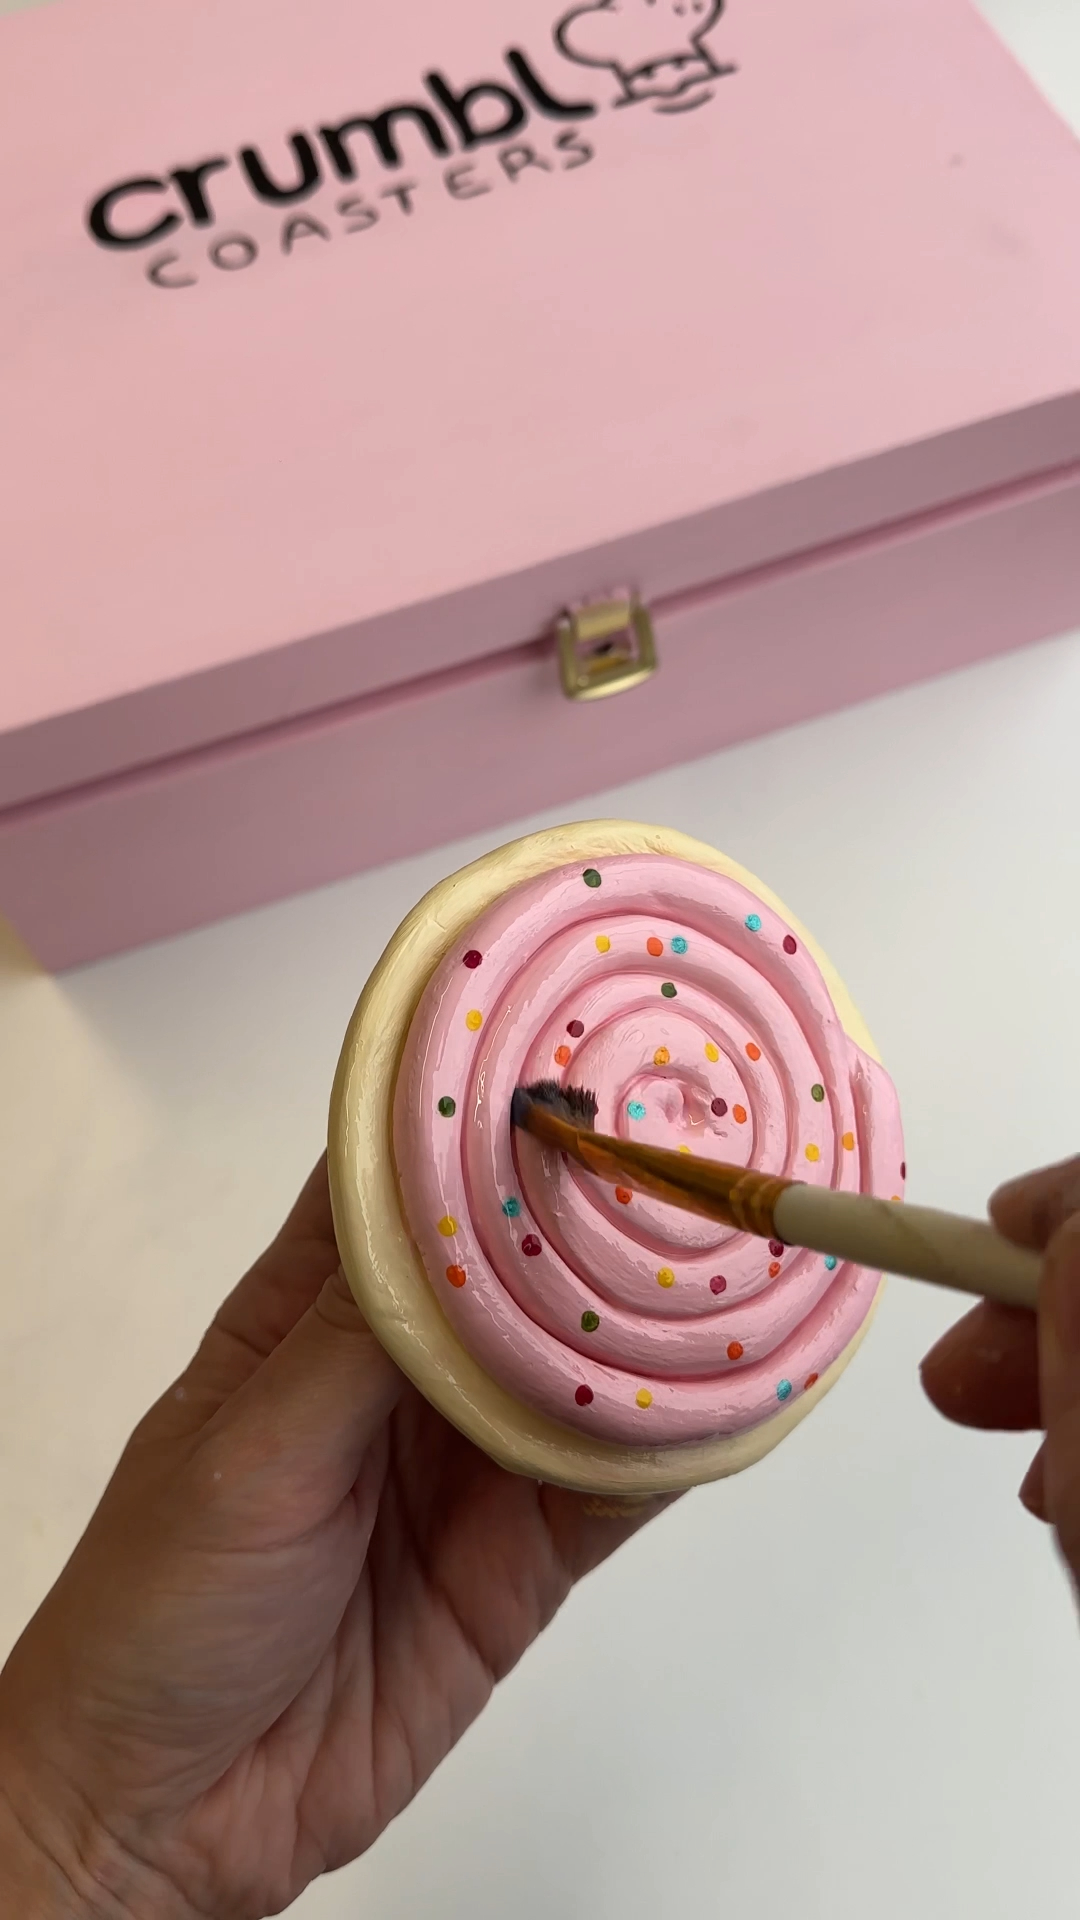
step 5: seal the coaster for everyday use
once all the paint is fully dry, brush a couple of layers of jdiction gloss sealer over the entire coaster — top, sides and underneath. this gives the surface a properly shiny “glazed cookie” finish, and helps make it heat-resistant and water-resistant.
let each layer dry fully before adding the next. two thin coats usually do it; three if you want maximum gloss.
watch out: even with a water-resistant sealer, wipe spills quickly and never soak air dry clay pieces. these are coasters, not dishwasher items 🫶
step 6: repeat for the full six-piece line-up and fill the box
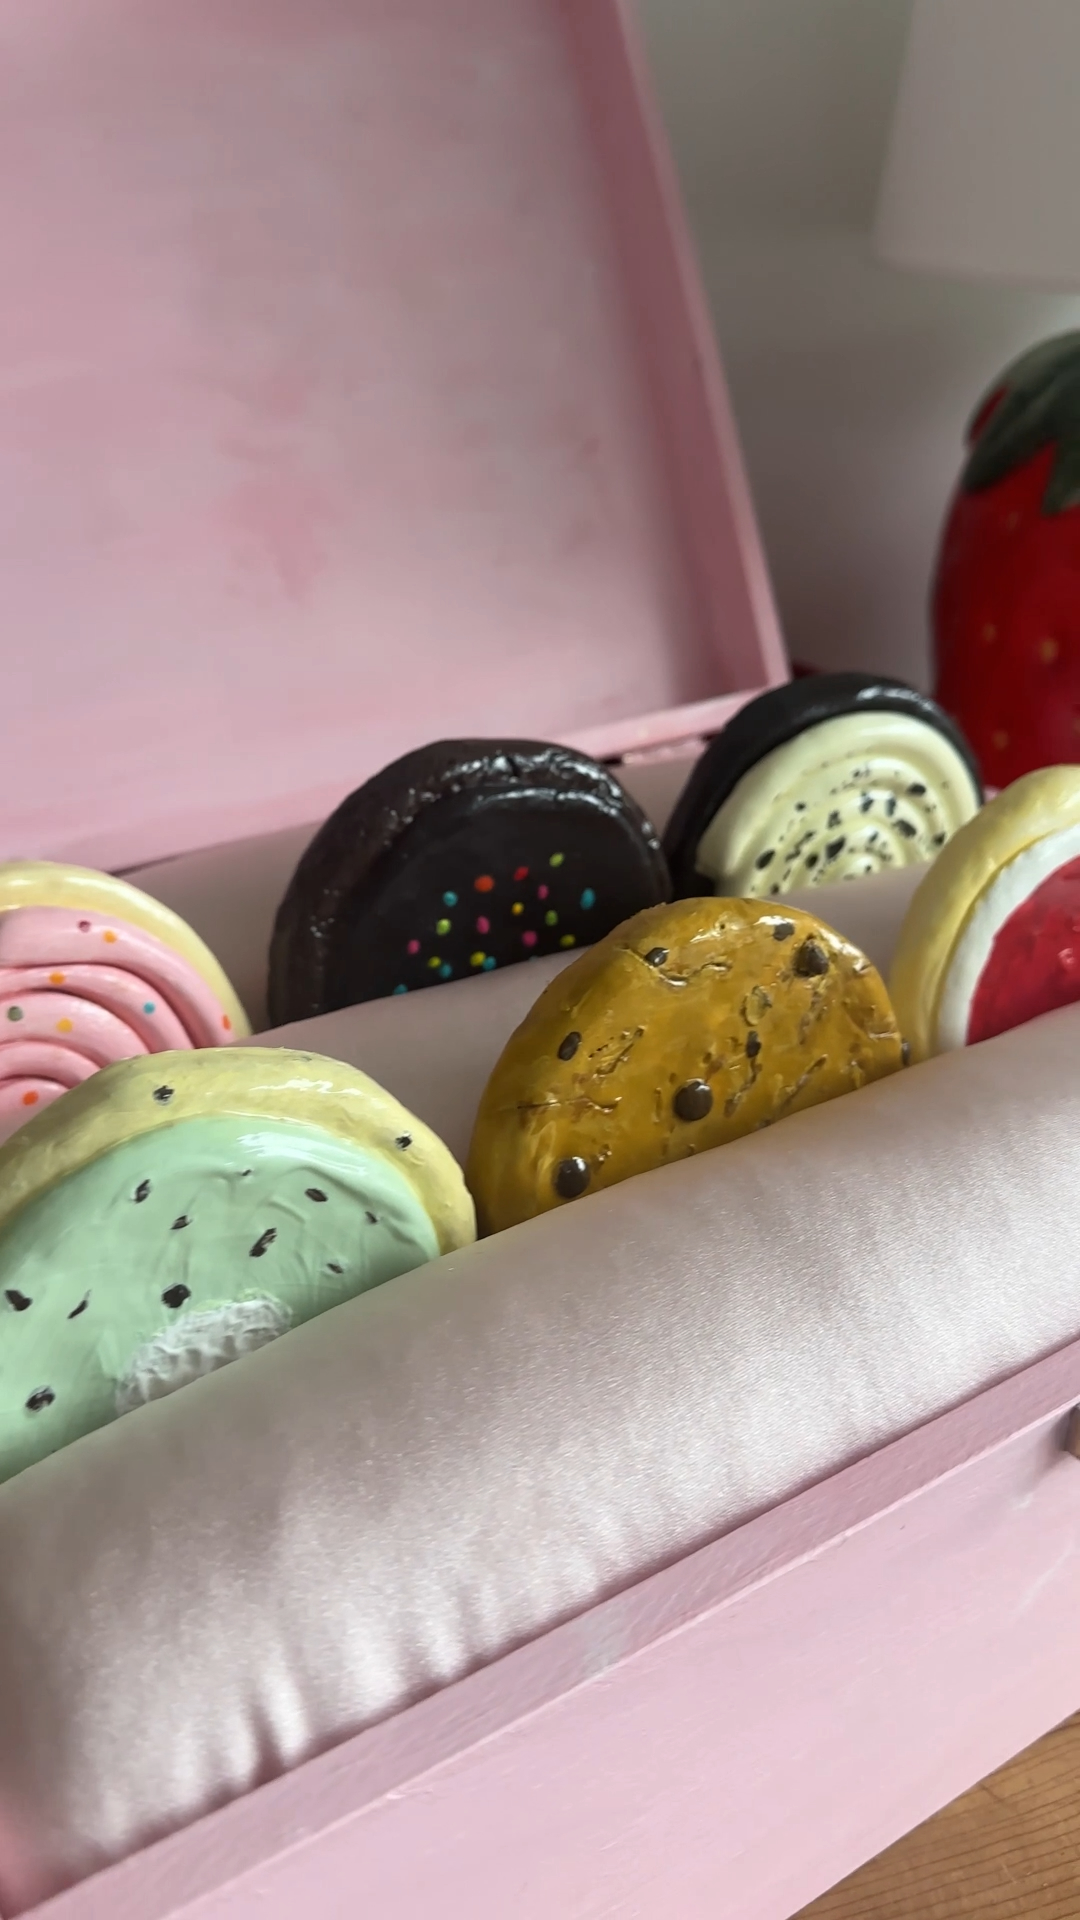
once you’ve got the technique down with the pink confetti cookie, repeat steps 3–5 for five more cookie designs in your friend’s favourite flavours. my full line-up included: pink confetti sugar, mint chocolate chip, cookies & cream, birthday cake / vanilla sprinkle, milk chocolate chip & strawberry cheesecake. once you’ve got the box + first cookie technique down, the magic is in the variations!!!
once all six are sealed and fully dry, nestle them gently into the cushioned channels — two coasters per gap, sitting flat and proud. close the lid carefully (12cm box height = no drama), tie a ribbon around the whole thing, and you’ve got yourself a gift that genuinely looks like it came from a little boutique.

the verdict 👩⚖️
the cushioned box is what makes this project for me. the coaster on its own is cute — but sitting inside the pink fabric rolls, with five of its little flavour friends, it really feels like a collectible. the kind of gift she’s going to keep! 🥹✨
would I make this again?? absolutely. it’s the most thoughtful birthday gift I’ve given in ages, and it cost less than the actual cookies would have. obsessed
yes — air dry clay makes brilliant decorative coasters as long as the pieces are fully dry and properly sealed. an 8–9mm thick base + two coats of gloss sealer is the magic combination for everyday use.
these coasters used an 8–9mm thick base with the icing swirl around 6–7mm thick on top. that gave them a sturdy “proper coaster” feel without making the raised icing so tall that cups wobbled.
these medium-sized pieces were left for 48 hours. drying time varies depending on clay thickness, room temperature and humidity — somewhere between 24 and 72 hours is normal. the clay should feel cool, not damp, when fully dry.
yes, especially if they’re painted. without sealer, paint can lift if water splashes onto it, and the clay itself is porous. this project used a couple of layers of jdiction gloss sealer to protect the surface and give it that shiny cookie finish.
they’re water-resistant rather than fully waterproof. condensation from a cold glass is fine. wipe spills quickly with a soft cloth and never soak them — air dry clay can soften if it gets properly wet.
- making the icing swirl too raised — cups will wobble (keep it ~6–7mm max)
- painting before the air dry clay is fully dry — trapped moisture warps the piece
- using a box that’s too shallow once the cushioned insert is in (always go 12cm+)
- rushing the sealer — thin coats, fully dry between each one
- over-stuffing the foam — too much foam squashes the coasters and stops the lid closing
- forgetting to seal the back of the coaster (the underside will scratch a surface otherwise)
more like this
looking for more DIY inspiration? Take a look at some other projects I've done similar to this one.
join my monthly craft club
a monthly drop of new bits, behind-the-scenes chaos, and ideas to brighten your brain. pop your email in and i’ll send you something nice